Nos membres - Our peeps

Tuesday, June 29, 2010

Altered Frame + Flower Tutorial

Hey everyone! This alter frame I made for my Dad, and I had so much fun doing it!! It is also a super cheap gift to make someone! (I know we don't want to think of it but christmas will be here before we know it!) Lets get started!!

To start you need an unfinished frame you can get them at most craft stores the one I used cost only a $1.50! See what I mean cheap!! I took some white paint from Making Memories called "Spotlight", I took a paint brush and dry brushed the frame, I did not want to cover the whole frame because I like the look of the wood showing through the paint.


Once the paint dried I took some :"Gold-like" paint from Adirondack and dabbed it onto my finger then rubbed it on the frame. Once the Gold paint was dried I put a coat of Tim Holtz "Rock Candy" Crackle paint. Just a note about the "Rock Candy" paint I had to apply 2 coats because the paint soaked into the frame. Next time I am going to try putting a coat of mod podge first then the "Rock Candy" and see if it will crackle better.   

When the paint dried I took Tim Holtz Distress Ink in "Vintage Photo", dabbed my finger into the ink and then rubbed over some of the cracks made by the Crackle paint; they would stand out more and make the frame look more distressed.
When I was waiting for my frame to dry I started working on my flower. I took two white Prima flowers.  I sprayed the bigger flower with "Creme de Chocolate" and the smaller flower with "Walnut Gold" Glimmer Mist from Tattered Angels.
I set the flowers aside to dry and started working on the pin. I just got a pin with a pearl end, a lose pearl bead and a spacer. I took a hot glue gun and glued the pearl and the spacer onto the pin. You do not have to use hot glue it is just quicker and you don't have to wait for it to dry.

When my flowers were dry I took some Smooch Accent Ink in "Molasses" and rubbed it around the edges of the flower and also some on the petals of the flower.


When I was done with the "Smooching" I took all the layers for the flower and adhered them together. I used Prima rhinestones for the center of the flower and I placed the pin and feathers behind the flower.

The last part is to just have fun with it and decorate your frame the way you want to! I kept mine simple and just added the flower I made and some Prima rhinestones.

Thanks everyone!! I hope you have fun altering your own frames!!!
Melissa

Saturday, June 26, 2010

KISS (Keep It Simple Saturdays) with Michelle ~ Heat Embossed Buttons Tutorial

x
Happy Saturday Everyone! I hope your start to your weekend is a good one!

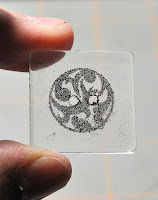
Here is a fun and interesting way to use heat embossing and buttons together to create unique embellishments for your projects. The best part is most of us have buttons and heat embossing tools in our stashes already! So let's get started...

Here are the tools and supplies you need for this method:
  • Plastic buttons
  • Heat gun
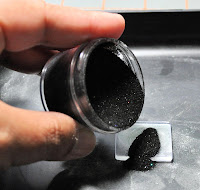
  • Embossing powder
  • Water-resistant ink pad such Versamark
  • Anti-static pad
  • Tweezers (not shown)
  • Bone Folder (not shown)
  • Powder tray or scrap paper (to catch the excess embossing powder)
  • Stamp image of choice
Here is the recipe you'll need to complete this method:

Rub your anti-static pad across the button.

Stamp your image onto the button using water-resistant ink.


Pick up your button using tweezers. DO NOT move the tweezers once they are in place.

Pour embossing powder over the button. Gently tap off excess powder onto tray or scrap paper. Tip: If you find your stamped image is not as crisp as desired, simply rub off the embossing powder with your finger and repeat steps #1 through #4.

Use your heat gun to emboss the powder. Ensure your fingers are gripping the tweezers firmly yet far away from the heat.

Once heat embossing is complete. Set aside the button and tweezers to cool. *Caution: Tweezers will be hot to touch because it is metal, metal heats up more quickly than plastic. This should take no longer than 15 mins to cool dependent on the strength of your heat gun. Please be careful once you've reached this step.

Remove tweezers from button. You are ready to use your newly created embellishment!


Tip: Use flat buttons for easier handling throughout this entire process.

It's amazing how you can change a look of a typical embellishment into something one-of-a- kind. And it is so easy and simple! Try mixing and matching your colored buttons with colored embossing powders to create a whole new look to your buttons.

Until then I hope you will try this method out and have fun with it! Until next Saturday, Happy Crafting!

KISSes and Hugs ~Michelle

Tuesday, June 22, 2010

PDSS CLSC17 Challenge + CLSC16 Winner

Hey all, I am so sorry to have missed last week's challenge, things haven't been going well for my family theSE past few weeks. I also would like to apologize for my lack of presence in forum, I'm not sure how long it would take me to emotionally recover from all the drama that's happening in my life. Thank you in advance for your patience and understanding. ~ Nini xoxo

***WINNER OF CLSC16****

Our entries for our last card and layout sketch challenge were ALL so VERY amazing! Thank you SO much for playing along with us we LOVE seeing your work!!! Now for the winner of challenge PDSS CSC16 via random.org goes to..... 


Winner: #7 Trina Kison (card)

Prize: Prima Flower Package Assortments 

***CHALLENGE CLSC17***
Moving on... Here's what you'll be working with for the next 2 (two) weeks! We cannot wait to see more of your wonderful cards & scrapbook layouts!


**Please note that you may enter twice by creating one project per sketch (card AND layout) or enter once by picking the sketch you'd like to play with (card OR layout)... It's all up to you! :)


Card Sketch #17:

Layout Sketch #17:

You can flip, rotate, resize or do whatever your crafty heart desires as long as we can still see the original sketch in your creation then you're good to go! These challenges are on a bi-weekly basis, so that means you'll have two (2) weeks to get your creations completed, loaded and linked up!

For this challenge Posh Designs Scrapbook Store is giving away...
A random assortment of STICKERS & RUB-ONS!!! (spankin' new in packaging) How fabulous is that!!!

All you've got to do is participate by creating anything with the sketch in mind. Submit your creation to Mr. Linky below by typing your name and leaving a direct link to your project. Here's some inspiration from our lovely DT to help you get started!

Michelle (card)

Lynne (card)

Lynne (layout)

Kim (card)

Charlene (card)

Melissa (layout)

Amy (card)


Deadline: July 5th @ 11:59 PM EST Canada. Please type your name & direct link to your creation in the Mr. Linky box below.

Thank you and happy crafting!

Thursday, June 10, 2010

Tutorial Thursday with Kim - Stair card

Hi girls!

Today a simple tutorial for a great card! Start with a 5 1/2" by 10 1/2". Fold It to; 1 1/4", 2 1/2", 4 1/4", 6" and 8 1/4".

Now simply fold It this way,

I hope It's clear enough! Now simply embelish as you want! I've cut some papers, ink some great stamps, well... I was really inspired and made a lot of fun!

Here's the final result!

Give it a try! Hugs and kisses

Kim @ KLDezign

Tuesday, June 8, 2010

Bling It On!!

That's right, this post is all about the bling!! Glitter, Distress Stickles, Glimmer Mist & Sharpie. That's right....Sharpie!! We all have those don't we? Have you ever thought of using them to add some bling to your layouts or other projects? No, you say? I think I just might be able to change your mind.

But first, here's the layout I just made. See if you can spot the Sharpie.


Yes, there's definitely glitter on the title, and a bit of Glimmer Mist on the lace......

And there's definitely Distress Stickles on the butterfly & the leaves.........

Still can't see the Sharpie?

How about now? No? Need a hint? Take a look at the rhinestones. That's right, the rhinestones! Okay, let me explain.

Whenever I decide to purchase rhinestones, I don't know what color to buy. Let me back up. I don't normally shop for products with an end result in mind. I usually make my purchases based on appeal first, cost second & availability last. So, I never know what color flower, rhinestone, lace, etc I need before I sit down to scrap.

Needless to say, I rarely have the right color of everything I need, for any given project. One great reason why I love my Cuttlebug & Cricut so much, is that I can make anything in any color!! Especially flowers and leaves!! I also purchase lace in white or off-white, so I can tint it with Glimmer Mist or my home-made version of it. Distress Stickles is also great to have on hand, although I don't have many colors. I can still add some sparkle to any layout with the Rock Candy, as the color underneath will show through.

So, what does this have to do with a Sharpie? Well.......I have started purchasing clear rhinestones, including flourishes, this way I can color co-ordinate them with any layout or project I might have in mind!!

Now do you see it? If you're still unsure, here's a peek at some flourishes that I have started to color for another project......

Sorry, bad picture. Very cloudy today, the lights aren't helping, and the flash is giving off too much glare. As I was saying, take your Sharpie and color each individual stone......no, it doesn't take very long!! Don't like the color? Go over it with another color, and it will remove the first color you used, providing that it's not too dark. It takes no time to dry, so you can color, wait about 30 seconds, and apply it to your project.

I'm sure you're wondering if you can use other markers......yes, you can. As long as your marker is not water-based, it will work!!! And the best part of this, is that you are not limited to the 'in' colors or whatever color your local craft store may carry!!

Try it out for yourself, you'll love this idea. And stay tuned in for another great 'bling it on' idea. I'm testing something else!!

Happy blinging!!
Lynne

Monday, June 7, 2010

Alter It Monday ~ Flutter on by my Butterfly!

Flutter on by...my Butterfly!

Summer is upon us and the butterflies are flitting about.  This is such a wonderful sight to behold!  Could you imagine being carried about in the breeze on whisper light wings?  Oh to be a butterfly!

I thought about that today and gathered together a few of my favorite supplies.  I had to create a Butterfly!

I used some pattern papers, adhesives (wet and dry), and a piece of raffia.

I cut one piece of pattern paper in an elongated trapezoid shape. 
 

I folded the wide end of the trapezoid up and over the raffia that I folded in half.  This was then glued in place.
 

Roll the pattern paper all the way to the end and glue in place.  This creates the Butterfly's body!
 

Fold another piece of pattern paper in half and adhere it firmly in place on all sides.
 
Get out those trusty old decorative scissors and freehand cut some wings. 

Pinch and fold the bottom wing and glue in place.  Alternatively, a staple will do nicely as well.  Repeat this for the top set of wings.

Adhere the body to the wings and there you go!

Saturday, June 5, 2010

KISS (Keep It Simple Saturdays) with Michelle ~ Stamping onto Photographs Tutorial

Hi everyone!

Summer is here and if your family is a busier one during this time of year, you may find yourself with little crafting time to spare. This week's post is a ultra-short one. I wanted to show you a simple yet very creative way to use your stamps.

When stamping think beyond cardstock and patterned paper; stamp onto your photographs for added interest. Here are some of my creations using this method:


The type of stamp pad is very important to accomplish this method. You will need a solvent based ink such as Staz-On. Solvent based inks are best for porous surfaces such as wood, leather, and photo paper. Water based inks such as your usual dye based inks will repel against photo paper. Pigment based inks will not absorb fully onto photo paper.

There is only two key points to remember when using Staz-On onto photographs:
  1. No matter what type of stamp you use (rubber, acrylic or foam), stamping onto photos directly will have a little 'slip n slide'.
  2. Any type of stamp you use for this method will stain. Bear in mind this in no way change the effectiveness of the stamp for other uses and with other types of ink pads.
Here are some tips and tricks when using solvent based inks & stamps onto photographs:
  • Do not crop nor mat your photo first. Stamp first then trim if necessary your photograph to ensure its proper size and dimension.
  • Before stamping onto your photograph, use a temporary adhesive on the back of the photograph and place onto a non-stick crafting mat. This will ensure your photograph will stay in place when stamping.
  • Ensure proper drying time when using this method. This will prevent any smearing of the stamped image. However should you smear by accident, simply use Staz-on cleaner dabbed onto a kleenex and gently pounce off the smeared stamped image. Your photograph should not ruin by doing this. DO NOT use a heat gun to speed up the drying time as this may warp your photograph by bending them or cause ripples onto the photo paper. Personally I have left my stamped images to dry overnight to prevent smearing.
  • Ensure when you stamp to stamp in a up and down fashion, not an angle and use firm pressure. This will leave you with a cleaner image and prevent alot of the 'slip n slide' I mentioned earlier.
That's really it when it comes to stamping onto photographs using solvent based inks. If you like to try this method, I recommend having a black and brown solvent ink pad in your stash as a base. Once you are comfortable using this method pick up other colors, the creative possibilities are endless! Try this method yourself and you might think of what to stamp next in a whole new light! Until next Saturday, Happy Crafting!

KISSes and Hugs ~Michelle
 

Blog Design By Sour Apple Studio © All Rights Reserved.