Nos membres - Our peeps

Tuesday, October 12, 2010

PDSS CLSC18 Challenge

We're baaaaaaaack!!!

We missed playing with ya'all, we're resuming where we left off so welcome to Challenge #18! Here's a little reminder of our gaming rules (old timers no worries nothing has changed hihihi)! Okay first, CLSC stands for Card & Layout Sketch Challenge these challenges are for both the card makers & scrapbookers out there!

Please note that you may enter twice by creating one project per sketch (card AND layout) or enter once by picking the sketch you'd like to play with (card OR layout)... It's all up to you! :)

You can flip, rotate, resize or do whatever your crafty heart desires as long as we can still see the original sketch in your creation then you're good to go! These challenges are on a bi-weekly basis, so that means you'll have two (2) weeks to get your creations completed, loaded and linked up!


Card Sketch 18:


Layout Sketch 18:


For this challenge Posh Designs Scrapbook Store is giving away goodies from Basic Grey's new Pyrus line!!! Winner receives a paddie, a package of glazed brads, & a package of woolies! YAY!!!


All you've got to do is participate by creating anything with the sketch in mind. Submit your creation to Mr. Linky below by typing your name and leaving a direct link to your project. Here's some inspiration from our lovely DT to help you get started!


Nini (card):

Melissa (Layout & Cards):
{Thanks Mel for creating all of these examples until the new DT gets settled in, xoxo}


Deadline: October 25th @ 11:59 PM EST Canada. Please type your name & direct link to your creation in the Mr. Linky box below.


Thanks & Happy Crafting


Tuesday, September 28, 2010

PDSS Challenges Resuming Soon

Hey all!!!

Just a quick post to let you-all know that our sketch challenges will resume on Tuesday October 12th see you soon for our card & layout challenge #18!!! ♥ ~ Nini xoxo

Sunday, September 26, 2010

Making Your Own Message Board

Making Your Own Messaged Board

I bought a piece of cork board a couple of years ago and never did anything with it. Now, that I've found it in my scrappy stash I decided to use it up before I lose it again! You can get cork sheets at any craft or office supply store.

I started by hot gluing a sheet of light weight chipboard to the back of it so it won't full apart from using push pins going into it over the years. I used hot glue, this helps it stay together really well and I don't think white glue would be able to keep the two together.

Once I was done with that I painted the edges so they would look pretty and you would not see plain old cork. I used copper colored paint.


To cover the cork I used Teresa Collins paper from her Documented line. I used the sheet with the big clock in the middle of the paper. I cut the clock out and distressed the edges of what was left with the paper and inked them with vintage photo distress ink. 

I then cut out a tag from the same paper line distressed and inked it as well using vintage pink glimmer mist to it. I also added some prima flowers and a few roses, feathers and a stick pin that I made. I punched two holes at the top and pulled lace though them so I could hang it on the wall. Lastly, I added a butterfly clip to the lace.  


Here are a few close ups...


I then made matching pins using my i-top I just toke the same paper line so that they would all go together.


Now here is how it looks hanging on my the side of my fridge. I had a lot of fun making this message board and it only toke about 2 hours to do!! Very fun and easy!!
I hope you guys have fun crafting!!!

Thursday, September 23, 2010

Grand Opening, DT Call & more!!!

Hello everyone,

it's been a while since our last post, let's just say that we've been busy whipping up a lot of exciting changes we're bringing to the store. First off, we have a special announcement to make, Posh Designs Scrapbook Store will be opening its first brick & mortar store in Montreal!!! We would like to thank each and every one of you for making this lifelong dream a reality!!!

We're so psyched about this and can't wait to see you next month at our Grand Opening! Due to Bill 101 in Quebec our store's name will be changed to our registered company's name: La Scrapboutique à Nini translation from French: Nini's Scrapboutique!


In order to better serve our local clients, you may shop both in store and online with the option to pick up your order to save on shipping. More updates about the store will be posted on the blog and our other social marketing sites.

Oh and speaking of Social Marketing the fabulous author Jan Zimmerman has published an amazing and insightful new book called: Social Media Marketing All-in-One For Dummies that hit the bookshelves just 2 days ago and we're so incredibly happy to announce that our web based marketing strategies and the story behind Posh's web presence are featured in this awesome book!!! Be sure to check it out it's worth a read especially if you're looking into internet advertising!!!

Last but not least we're searching for a couple of talented, upbeat and drama-free ladies to join our Design Team! If you love challenges, blogging and talking about crafts then you might be just the one we're looking for!!! Click HERE for our Design Team application.

We look forward to seeing your work!!! Thank you for taking the time to stop by and if you have any questions please do not hesitate to let us know!

Hugs & smooches :) xoxo

Monday, August 2, 2010

Alter It Monday ~ Coffee Filter Cosmos!


Hello and Happy Monday!
Today we are going to create Cosmos flowers with coffee filters and Glimmer Mist!  
The needed supplies are:
~coffee filters, 5
~A number of Glimmer Mists, I used 5!
~Staples and stapler
~Coordinating chalk ink
~Button
~liquid adhesive
Start off by misting the coffee filters.  Layer the colors as you see fit and make them all pretty. 
When you have the desired colors on the filters, set them aside to dry.  After a few minutes, wad them all up in your hand and crumple them into a ball.  Set that aside to dry.  Once dry, smooth them out into their circles again.
Fold each circle in half.  Fold rounded edge down to the first fold line.  Repeat on other side.
Fold this in half again and pinch/hold for stapling.
 
Alternate and overlap stapled ends.  Staple in place.
 
Fluff out the petals of the flower to desired fullness.
Take the Chalk Ink and swipe on the center of the flower.  Glue Button in place with Liquid adhesive.
Enjoy your flower!
Have a wonderful day!
~Amy

Saturday, July 17, 2010

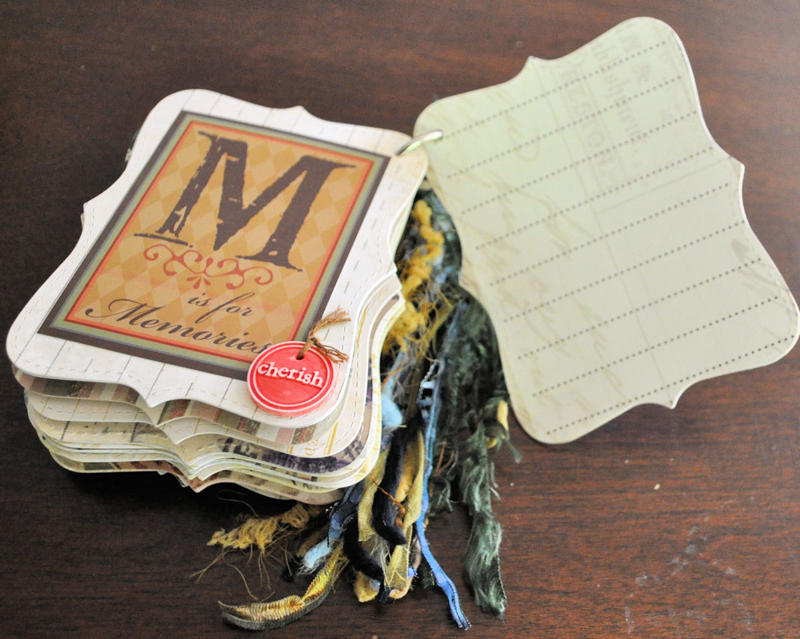
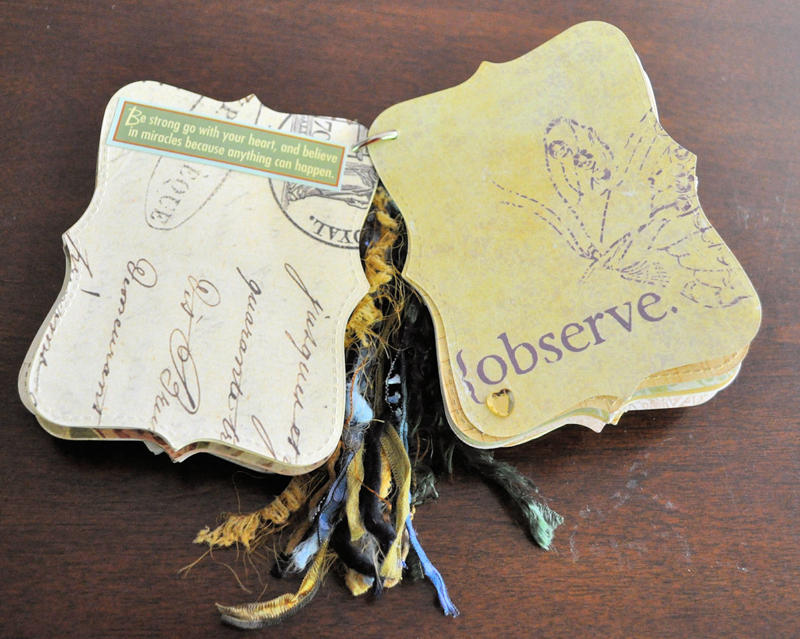
KISS (Keep It Simple Saturdays) with Michelle ~ A Simply Made Mini Album Tutorial

Hi Everyone and I hope you are having a great weekend thus far!

This blog post is going to be about making a mini-album. Now I know there are tons of tutorials and videos showing the amazing and vast examples of mini-albums. This post (as with all my blog posts) is about taking the simplistic way to create a meaningful album by using very few tools and supplies you have already in your stash.

You may know that making these types of projects is not my forte. I love seeing them and appreciate the craftsmanship but then I wondered if one mini-album can be created quickly, beautifully and easy to assemble as well. Here's the story behind this mini album...


My girlfriend and I were 1 month apart being pregnant. Currently I am 6-1/2 months along (baby and I are doing really well) but my friend was having a troublesome pregnancy right from the get-go. A long story short, she had gone into labour early (being almost 24 weeks) and gave birth to a son named 'B' (abbreviated for privacy reasons). My friend is obviously going through a challenging time in her life right now. She is in the big city, away from family and friends, her home and surroundings all the while concentrating on helping her son fight the fight of his life. I wanted to give her an outlet to express herself and remember the private yet precious moments of her son's young life. Hence this mini-album (mind the pun, not intented here) was created for my friend.

To assemble this mini album quickly, here is my short list of supplies and tools required:
  • Die shape of choice (for this project I used a top note die which was big enough for journalling, photos and/or attaching pockets to). You can use any shape you wish whether it be from a electronic based machine or manual use.
  • Cutting machine compatible to cut/create the above shaped die of choice (I used my Big Shot but any die cut machine will do).
  • Binder ring
  • Embellishments of choice (I encourage you to dig through your stash and use it up)
  • Patterned paper of choice (again use up what you already have whether it be full sheets or scraps)
  • Stamps and ink if desired
  • Adhesive
While I won't go through the steps on how I created and assembled my mini-album; I will share with you my thought process on how I mix and matched my supplies:
  1. Gather up everything (I mean everything - from the above list of supplies) you want or think you want to use to create this mini album. Shop once from your stash and do not look again until the project is complete.
  2. Create separate piles within your stash that you would want to use on a page. Do not think whether or not you'll use the elements until you start creating.
  3. Arrange those piles in the order of the mini-album presentation. Decide at this point if you are going to make it double or single-sided pages.
  4. Start creating! The process on how you create each page is up to you - you can create page by page or in mass production (i.e. cut all pages first, layer on embellishments next and so on...).
  5. Assemble your pages together for your mini-album.
  6. Once you have assembled your finished project, take one good look over. Make any adjustments or changes but try not to re-do (remember this is supposed to be quick and easy). When you have made your final touches complete - DO NOT touch the album again! You are officially done.
My biggest tip for this type of project is... If you spend the time in the beginning to choose your supplies and elements plus arrange them in a way to make creating easy for you; you should not have to go back and make any last minute changes. Again this is my humble and personal opinion only.

Here are some of my favorite pages from this album (this was hard to choose):


I hope I have demystified and encouraged you to make a mini-album. After all paper crafting is not meant to be complicated or seem out of reach for some to be intimidated not to create. Take a deep breath and dive right in. Enjoy the creative process and relish in your finished projects. If you put your heart into it, your mini-album will be enjoyed by others for a long time to come. No matter how simple or elaborate your project may be.

Until next Saturday, Happy Crafting!

KISSes and Hugs ~Michelle

Thursday, July 15, 2010

Tutorial Thursday with Kim - Flower Tut PT1

Hi girls!

I always try to have matching flowers in my stash... Even if I own a lot, (maybe even too much for some...) I often miss out on THE perfect flower. Toda,y I'll show you an easy way to make some!

Start with a piece of white cardstock, take one of your favorite stamp, I suggest swirly designs something along that line...


Ink it with some Ranger Distress Embossing Ink. Stamp it onto your cardstock a couple of time, I've stamp my pattern 4 times and it was ok. Now it's time to emboss your design with black embossing powder. I now have this pattern twice. It's not important if your pattern isn't neat and all. You can see some "droplets" and "dustiness" on my cardstock but don't worry.

To make my flower I decided to use my Spellbinders die because I believe I don't use them enough! I will then cut my flowers in 2 sizes with those die templates.

Cut a little bit of the flower. You can see how I've cut them. Don't go too close to the center because your flower will break very easily.

Turn your flowers and ink them with Distress ink. (I used Pumice Stone)

Now let's give a bit of volume to our flowers. Roll the petals into a round piece. I use my paint brush. The more you roll the more your flower will be thicker. Roll down the biggest flower and roll up the smaller one.

Look at the result.

Add a glue dot and affix the two flowers together.

I added a little flower on the top because I knew I'll need a bit of contrast.

And now, the final touch. A pearl!!


Look how elegant it looks! I hope you'll love making these flowers! Hugs and kisses!

Kim @ KLDezign

Saturday, July 10, 2010

KISS (Keep It Simple Saturdays) with Michelle ~ Window Card Tutorial

Happy Saturday to You!

I am not sure about you but here in Eastern Ontario it is turning out to be one hot, humid Summer and it is not even July yet! So I thought of creating a 'light' card sort of speak and came up with this easy method on how to create a window card.

Here are the tools and supplies you'll need for this method:
  • Plastic or Acrylic craft sheet
  • Paper trimmer
  • Bone folder
  • Sheet of cardstock
  • Patterned paper (optional)
  • Adhesive - I recommend a very strong hold adhesive as you will be applying cardstock and patterned onto the plastic or acrylic craft sheet
This is the recipe you need to complete this method:

Trim your plastic or acrylic sheet to desired card size. Fold in half using your bone folder. If you are using a plastic craft sheet, when folding that sheet in half you may hear a cracking sound and think your sheet is tearing apart. It is not and is a normal sound in this process.

Trim your cardstock to the same dimension as above. Cut in half ensuring each piece fits on the inside of the card as well as the exterior of the card.

Apply adhesive to one piece of the cardstock and adhere to the inside. Trim off any excess cardstock from the plastic or acrylic sheet.

Repeat with the other piece of cardstock but to the back exterior of the card (i.e. to cover up any adhesive showing from the inside of the card out.

Choose a mat shape that you would like repeated 3 times (e.g. die cut or pre-made).
Line up 2 of shapes that will go on top of the interior of the card (cardstock side) and on its opposite interior side. Apply adhesive.
    Having your mat shapes line up, adhere the bottom piece first then lay the other piece with the adhesive side up, lining up the shapes seamlessly. Press your card firmly together.

    Take your last mat shape piece, position it on the exterior of the card (i.e. the cardfront) and again seamlessly line it up to the interior of the card (i.e. the side of the card where the adhesive is showing). Press firmly in place.

    Stamp, embellish and decorate as desired. You have just completed your window card!
    I hope you will have fun with this technique and try making a window card for your next occasion. I'd love to see your variations on this tutorial, you can post them in the Posh Designs Scrapbook Store Community Site. Should there be any questions, please drop me a line via the community site. Until next weekend, Happy Crafting!

    KISSes and Hugs ~Michelle
     

    Blog Design By Sour Apple Studio © All Rights Reserved.