Nos membres - Our peeps

Showing posts with label michelle. Show all posts

Saturday, July 17, 2010

KISS (Keep It Simple Saturdays) with Michelle ~ A Simply Made Mini Album Tutorial

Hi Everyone and I hope you are having a great weekend thus far!

This blog post is going to be about making a mini-album. Now I know there are tons of tutorials and videos showing the amazing and vast examples of mini-albums. This post (as with all my blog posts) is about taking the simplistic way to create a meaningful album by using very few tools and supplies you have already in your stash.

You may know that making these types of projects is not my forte. I love seeing them and appreciate the craftsmanship but then I wondered if one mini-album can be created quickly, beautifully and easy to assemble as well. Here's the story behind this mini album...


My girlfriend and I were 1 month apart being pregnant. Currently I am 6-1/2 months along (baby and I are doing really well) but my friend was having a troublesome pregnancy right from the get-go. A long story short, she had gone into labour early (being almost 24 weeks) and gave birth to a son named 'B' (abbreviated for privacy reasons). My friend is obviously going through a challenging time in her life right now. She is in the big city, away from family and friends, her home and surroundings all the while concentrating on helping her son fight the fight of his life. I wanted to give her an outlet to express herself and remember the private yet precious moments of her son's young life. Hence this mini-album (mind the pun, not intented here) was created for my friend.

To assemble this mini album quickly, here is my short list of supplies and tools required:
  • Die shape of choice (for this project I used a top note die which was big enough for journalling, photos and/or attaching pockets to). You can use any shape you wish whether it be from a electronic based machine or manual use.
  • Cutting machine compatible to cut/create the above shaped die of choice (I used my Big Shot but any die cut machine will do).
  • Binder ring
  • Embellishments of choice (I encourage you to dig through your stash and use it up)
  • Patterned paper of choice (again use up what you already have whether it be full sheets or scraps)
  • Stamps and ink if desired
  • Adhesive
While I won't go through the steps on how I created and assembled my mini-album; I will share with you my thought process on how I mix and matched my supplies:
  1. Gather up everything (I mean everything - from the above list of supplies) you want or think you want to use to create this mini album. Shop once from your stash and do not look again until the project is complete.
  2. Create separate piles within your stash that you would want to use on a page. Do not think whether or not you'll use the elements until you start creating.
  3. Arrange those piles in the order of the mini-album presentation. Decide at this point if you are going to make it double or single-sided pages.
  4. Start creating! The process on how you create each page is up to you - you can create page by page or in mass production (i.e. cut all pages first, layer on embellishments next and so on...).
  5. Assemble your pages together for your mini-album.
  6. Once you have assembled your finished project, take one good look over. Make any adjustments or changes but try not to re-do (remember this is supposed to be quick and easy). When you have made your final touches complete - DO NOT touch the album again! You are officially done.
My biggest tip for this type of project is... If you spend the time in the beginning to choose your supplies and elements plus arrange them in a way to make creating easy for you; you should not have to go back and make any last minute changes. Again this is my humble and personal opinion only.

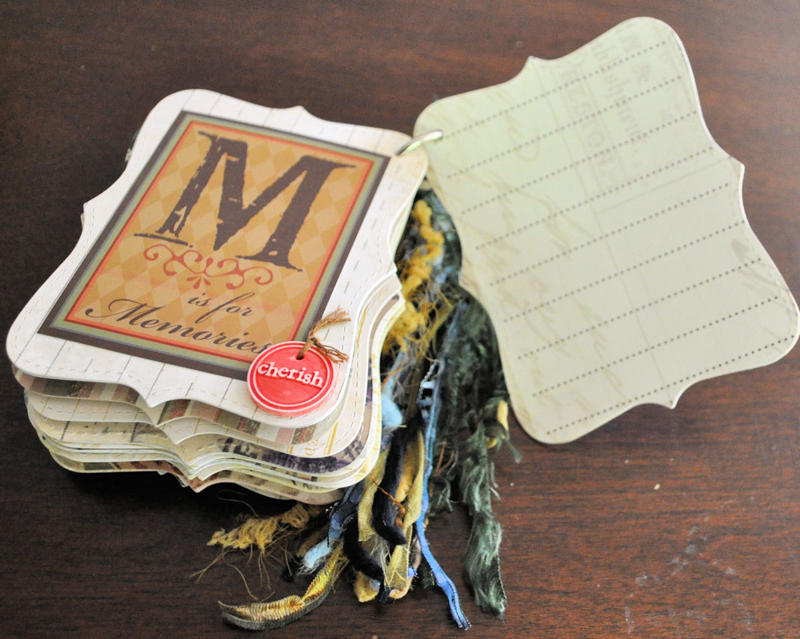
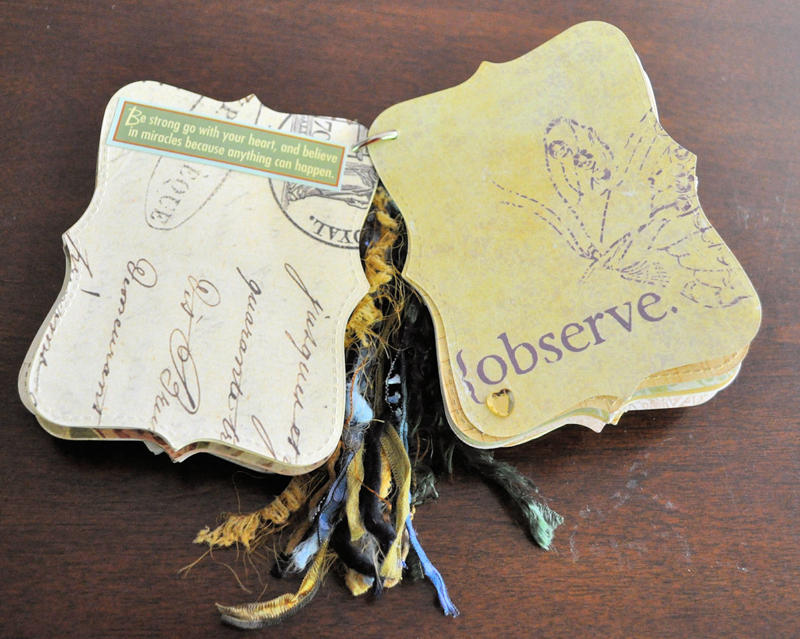
Here are some of my favorite pages from this album (this was hard to choose):


I hope I have demystified and encouraged you to make a mini-album. After all paper crafting is not meant to be complicated or seem out of reach for some to be intimidated not to create. Take a deep breath and dive right in. Enjoy the creative process and relish in your finished projects. If you put your heart into it, your mini-album will be enjoyed by others for a long time to come. No matter how simple or elaborate your project may be.

Until next Saturday, Happy Crafting!

KISSes and Hugs ~Michelle

Saturday, July 10, 2010

KISS (Keep It Simple Saturdays) with Michelle ~ Window Card Tutorial

Happy Saturday to You!

I am not sure about you but here in Eastern Ontario it is turning out to be one hot, humid Summer and it is not even July yet! So I thought of creating a 'light' card sort of speak and came up with this easy method on how to create a window card.

Here are the tools and supplies you'll need for this method:
  • Plastic or Acrylic craft sheet
  • Paper trimmer
  • Bone folder
  • Sheet of cardstock
  • Patterned paper (optional)
  • Adhesive - I recommend a very strong hold adhesive as you will be applying cardstock and patterned onto the plastic or acrylic craft sheet
This is the recipe you need to complete this method:

Trim your plastic or acrylic sheet to desired card size. Fold in half using your bone folder. If you are using a plastic craft sheet, when folding that sheet in half you may hear a cracking sound and think your sheet is tearing apart. It is not and is a normal sound in this process.

Trim your cardstock to the same dimension as above. Cut in half ensuring each piece fits on the inside of the card as well as the exterior of the card.

Apply adhesive to one piece of the cardstock and adhere to the inside. Trim off any excess cardstock from the plastic or acrylic sheet.

Repeat with the other piece of cardstock but to the back exterior of the card (i.e. to cover up any adhesive showing from the inside of the card out.

Choose a mat shape that you would like repeated 3 times (e.g. die cut or pre-made).
Line up 2 of shapes that will go on top of the interior of the card (cardstock side) and on its opposite interior side. Apply adhesive.
    Having your mat shapes line up, adhere the bottom piece first then lay the other piece with the adhesive side up, lining up the shapes seamlessly. Press your card firmly together.

    Take your last mat shape piece, position it on the exterior of the card (i.e. the cardfront) and again seamlessly line it up to the interior of the card (i.e. the side of the card where the adhesive is showing). Press firmly in place.

    Stamp, embellish and decorate as desired. You have just completed your window card!
    I hope you will have fun with this technique and try making a window card for your next occasion. I'd love to see your variations on this tutorial, you can post them in the Posh Designs Scrapbook Store Community Site. Should there be any questions, please drop me a line via the community site. Until next weekend, Happy Crafting!

    KISSes and Hugs ~Michelle

    Saturday, June 26, 2010

    KISS (Keep It Simple Saturdays) with Michelle ~ Heat Embossed Buttons Tutorial

    x
    Happy Saturday Everyone! I hope your start to your weekend is a good one!

    Here is a fun and interesting way to use heat embossing and buttons together to create unique embellishments for your projects. The best part is most of us have buttons and heat embossing tools in our stashes already! So let's get started...

    Here are the tools and supplies you need for this method:
    • Plastic buttons
    • Heat gun
    • Embossing powder
    • Water-resistant ink pad such Versamark
    • Anti-static pad
    • Tweezers (not shown)
    • Bone Folder (not shown)
    • Powder tray or scrap paper (to catch the excess embossing powder)
    • Stamp image of choice
    Here is the recipe you'll need to complete this method:

    Rub your anti-static pad across the button.

    Stamp your image onto the button using water-resistant ink.


    Pick up your button using tweezers. DO NOT move the tweezers once they are in place.

    Pour embossing powder over the button. Gently tap off excess powder onto tray or scrap paper. Tip: If you find your stamped image is not as crisp as desired, simply rub off the embossing powder with your finger and repeat steps #1 through #4.

    Use your heat gun to emboss the powder. Ensure your fingers are gripping the tweezers firmly yet far away from the heat.

    Once heat embossing is complete. Set aside the button and tweezers to cool. *Caution: Tweezers will be hot to touch because it is metal, metal heats up more quickly than plastic. This should take no longer than 15 mins to cool dependent on the strength of your heat gun. Please be careful once you've reached this step.

    Remove tweezers from button. You are ready to use your newly created embellishment!


    Tip: Use flat buttons for easier handling throughout this entire process.

    It's amazing how you can change a look of a typical embellishment into something one-of-a- kind. And it is so easy and simple! Try mixing and matching your colored buttons with colored embossing powders to create a whole new look to your buttons.

    Until then I hope you will try this method out and have fun with it! Until next Saturday, Happy Crafting!

    KISSes and Hugs ~Michelle

    Saturday, June 5, 2010

    KISS (Keep It Simple Saturdays) with Michelle ~ Stamping onto Photographs Tutorial

    Hi everyone!

    Summer is here and if your family is a busier one during this time of year, you may find yourself with little crafting time to spare. This week's post is a ultra-short one. I wanted to show you a simple yet very creative way to use your stamps.

    When stamping think beyond cardstock and patterned paper; stamp onto your photographs for added interest. Here are some of my creations using this method:


    The type of stamp pad is very important to accomplish this method. You will need a solvent based ink such as Staz-On. Solvent based inks are best for porous surfaces such as wood, leather, and photo paper. Water based inks such as your usual dye based inks will repel against photo paper. Pigment based inks will not absorb fully onto photo paper.

    There is only two key points to remember when using Staz-On onto photographs:
    1. No matter what type of stamp you use (rubber, acrylic or foam), stamping onto photos directly will have a little 'slip n slide'.
    2. Any type of stamp you use for this method will stain. Bear in mind this in no way change the effectiveness of the stamp for other uses and with other types of ink pads.
    Here are some tips and tricks when using solvent based inks & stamps onto photographs:
    • Do not crop nor mat your photo first. Stamp first then trim if necessary your photograph to ensure its proper size and dimension.
    • Before stamping onto your photograph, use a temporary adhesive on the back of the photograph and place onto a non-stick crafting mat. This will ensure your photograph will stay in place when stamping.
    • Ensure proper drying time when using this method. This will prevent any smearing of the stamped image. However should you smear by accident, simply use Staz-on cleaner dabbed onto a kleenex and gently pounce off the smeared stamped image. Your photograph should not ruin by doing this. DO NOT use a heat gun to speed up the drying time as this may warp your photograph by bending them or cause ripples onto the photo paper. Personally I have left my stamped images to dry overnight to prevent smearing.
    • Ensure when you stamp to stamp in a up and down fashion, not an angle and use firm pressure. This will leave you with a cleaner image and prevent alot of the 'slip n slide' I mentioned earlier.
    That's really it when it comes to stamping onto photographs using solvent based inks. If you like to try this method, I recommend having a black and brown solvent ink pad in your stash as a base. Once you are comfortable using this method pick up other colors, the creative possibilities are endless! Try this method yourself and you might think of what to stamp next in a whole new light! Until next Saturday, Happy Crafting!

    KISSes and Hugs ~Michelle

    Saturday, May 29, 2010

    KISS (Keep It Simple Saturdays) with Michelle ~ Ribbon Die Cut Tutorial

    Happy Saturday to you!

    Last weekend was a Victoria Day long weekend; an 'official' start to the Summer season. Although relaxing and fun, this past week was super crazy busy. This week's post will focus on creating super fun, ultra quick and really cool embellishments using your ribbon scraps, Big Shot machine and die of choice.

    I apologize in advance if you do not own a Big Shot. This is the only type of die cut machine I have that will cut through fabric. I am not sure if this will work with other machines like the Cricut, Cuttlebug or Quickutz (I know this will not work for the Slice die cut machine).

    Here are the tools and supplies you'll need for this project:
    • Big Shot machine with its cutting plates
    • Die of choice - it is highly recommended to use steel-rule based dies as they are best for cutting through fabric
    • Ribbon scraps or strips of the alike
    • Cardstock scrap
    • Scissors
    • Adhesive - it is also highly recommended to use strong adhesive that will hold the ribbon in place on the cardstock while putting it through the Big Shot machine
    Here is your recipe for this creation:

    1. Cut your scrap cardstock piece to desired size dependent if you want to create several die cuts or just one. Do not worry about the color of cardstock as the entire sheet will be covered in ribbon.

    2. Apply adhesive to the entire side of the cardstock.


    3. Place strips of ribbon in any order of choice going one way across the cardstock. Do not worry if your ribbon ends overlap the cardstock piece - this portion will not be die cut through the Big Shot.


    4. Lay your ribbon covered piece of scrap cardstock onto the die.
    5. Run through your Big Shot using the usual stack recipe (as per Sizzix).


    6. Enjoy and use your newly created embellishment on desired project such as on a card or scrapbook page.


    Tip: Use a heavy-weight cardstock such as 80lb or higher for support and durability of the finished die cut embellishment.

    Tip: Measure the biggest portion of the actual shape on the die itself if you choose to create just one embellishment. That way you are not wasting anymore cardstock or ribbon unnecessarily.

    Tip: You may have noticed that the top and bottom of the ribbon strips were not touched by the die therefore was not cut by the Big Shot. To me this is okay because I will save the scrap for another project. However should you wish to have a particular ribbon be part of your embellishment; ensure you place those pieces closest to the centre of your cardstock sheet.

    Tip: If you see any ribbon ends fraying after the die cutting process, simply cut these ends off using a sharp pair of scissors and then apply strong-hold hairspray when complete. The hairspray will prevent further fraying to occur (and yes this method works like a charm).

    Here are some cards I created using this method:


    Well I hope I have inspired you to use your ribbon and/or ribbon scraps in a whole new way. Some of the DT gals have shown other fabulous ways to use ribbon. Just type in ribbon and you will find all sorts of posts to help you create with this fabulous crafting supply.

    Have a great weekend crafters! KISSes and Hugs

    Michelle

    Saturday, May 15, 2010

    KISS (Keep It Simple Saturdays) with Michelle ~ My SIMPLE Craft Nook Tour

    Hello Everyone!

    Well we've had a blast of cold weather lately here in Eastern Ontario and it came as such a shock. So when deciding on what to post for this week's blog, I recalled one of my many conversations with my friend Nini (Owner of PDSS) and asked her if it would be cool if I showed my craft space? Nini agreed as this would be a first for this blog. One of the things I enjoy to see are craft rooms/spaces out there, either on video or blog. I guess it is for my never-ending quest to be uber-organized or when I get frustrated because I can't 'find' something; whatever comes first *laughing*. Nevertheless, I hope my tour will find some simple ways for you to organize your stash. Are you ready... Okay let's go!

    1. This is the view looking into my space. I have a modest nook in the basement which is raised from its foundation. This enables me to enjoy lots of natural night, see the waterfront (yes I live along the lakefront, I am a lucky gal) plus take a peek seeing my boys outside whenever they give me a chance to craft in peace. Most of my containers were purchased from Wal-Mart over time and they are all from the Sterlite brand. My aim is always to make my space as inexpensive as possible because I don't know if I'll keep the same configuration of drawers the same. These drawer units are stackable and interchangeable which works perfectly for me. Plus I wanted a clean look to my space, it gives me a sense of calm when I enter.


    2. Starting from the right side of my nook, there are these 4 stacked large drawer units that mainly house all my stamps (wood mounted, acrylic or cling mounted rubber). Each drawer is separated from one another into categories such as alphas, images, sentiments, occasions, elements and so forth. Here is a peek into one of those drawers:

    3. As you can see I house all my wood mounted stamps into these plastic containers from Scrap-Organizer. These containers are just slightly larger than the 8-1/2 x 11 size of cardstock and they are deep enough to hold my wood mounted stamps in place. There are certain instances I would separate a certain style of stamp from the others within a separate container and for me those are my Birthday and Thank-You stamps.


    4. The top drawer of this unit (located closest to my main crafting desk) houses my blocks, brayer and stamp-a-ma-jig (aka my most used stamping tools):


    5. Next to these sets of drawers are 2 large towers of 12 x12 drawer units which are bought as 1 unit of 3 drawers. I store all my ink pads and markers in ROY G. BIV order starting with White in the top units, then Black and Grey together which leads into the Reds, Oranges, Yellows, etc... The left units stores my ink pads. The right units stores my markers and other ink pads like Staz-on:


    On top of those units house my Scor-Pal, my scrap folder for cardstock and 3 individual containers ~ all my Christmas supplies, finished cards and layout pages in progress.

    6. Now we are along the window wall of my craft nook. Starting from the right corner, I have a set of 3 JetMax cubes. These are the 1 drawer units with the lil' cubbies inside the drawer. My specific use for this type of drawer are for my punches:


    These JetMax cubes are stacked and on top houses all my current 12 x 12 stash of cardstock and patterned papers inside those Cropper Hopper containers. The expandable folder beside my cardstock houses my speciality 12 x 12 cardstock like glitter, bling or other textured styles like dots (again in ROY G BIV order).

    How I store my patterned paper is fashioned after how my brain looks for paper. I go with either a theme or look I want to achieve like soft and pretty or masculine even playful and young. Hence that is the way all my patterned papers are stored in those like categories. If I have paper pads I store them as a whole within the category that suits that paper's theme. This has worked like a charm for me.

    I also store themed like papers/embellies together like Baby, Halloween, Travel within the mini Cropper Hopper containers.

    7. The unit next to my paper and punches are for my ribbons. Again stored in ROY G BIV order(can you see a pattern here?) for easy retrieval :


    8. The unit beside my main craft table houses my embellishments in the first 4 drawers then in the deeper drawer units store my misc. tools such as other adhesives and tools not used on a regular basis:


    9. Now the work-horse of my craft nook... My crafting table. It is old dining room table that has been re-purposed into my space. Along the back of table houses my fishing tackle box with all my smaller embellies:


    Below my crafting table are my idea books, magazines and catalogues plus a rolling carte that houses my 8-1/2 x 11 sheets of cardstock. Top crate holds my usual cardstock (in order of ROY G BIV) and the bottom crate houses my speciality cardstock and papers:


    10. Next to my tackle box is another 3 drawer unit which houses my most used tools separated in this order - cutting, adhesive, larger units of adhesive regularly used like my ATG gun. I keep my piercing pad, stamp cleaner pads and my Big Bite out beside this unit:


    11. In this tool box, I store my smaller regularly used tools like rulers, paper piercer, pencils, and such here. My baby wipes for easy clean up are close at hand which sits on top of a box that is empty:


    12. The back unit is an old microwave stand which again got re-purposed for my craft nook. On top sits my embossing tools, misc stuff, acrylic stand for taking photos and my inspiration box to create projects with my Slice machine. In the middle unit of the stand holds more misc stuff not frequently used. The bottom unit (which you can't see in the photo) stores all my chipboard - bought and recycled plus my vinyl sheets:


    13. Last but not least, my long white table has been dubbed as the cutting station. What you see in the open and above these drawer units are pieces of memorabilia I need to scrap with, my trash can (how exciting I know, ha.) and huge pile of leather and suede sheets to use with my Big Shot. You can see my Big Shot and Slice on top. The drawers on the left hold all my tools and supplies for those machines like dies, design cards, tag maker and frames. Actually the 1st drawer houses my Slice supplies. The bottom two drawers holds all my Sizzix tools and it is filling up fast:


    The unit on the right holds all my not so frequently used crafting related tools and supplies such as paints, re-inkers, thread, coloring pencils and chalks, etc:


    Well that it. That's my craft nook tour. Thanks for coming along for the ride! If there are any questions, please let me know. I would love to see your craft space. Post photos as a blog post in the PDSS Community Site or start a discussion in our SCRAP ROOMS AND ORGANIZING TIPS section and share your area of creativity.

    Have a great week crafting!

    KISSes and Hugs ~Michelle
     

    Blog Design By Sour Apple Studio © All Rights Reserved.