Nos membres - Our peeps

Tuesday, June 30, 2009

It's Candy Time! Yummy Blog Candy Giveaway! CLOSED


Hiya all! Hope everyone's doin' great!!!

Happy Canada Day just in case I don't get to chat with you tomorrow *lol* I have been cleaning up for our big move and discovered that I have tons of scrappy supplies that sadly I won't be able to tag along with me and I certainly do not think that one blog candy should be enough to clear out my "personal" stash *lol* with that said keep an eye on my blog because with moving does come purging! Be sure to follow Posh Designs to not miss out on any of my future giveaways *lol* :)

Here's a detailed list of what's included in this candy:

  1. One 9x9 Bo Bunny Bare Naked Binder
  2. One Giant Heidi Swapp Mask (Bracket)
  3. One Pack Daisy D's Rub-On Transfers (Reflections)
  4. One Pack Prima Say it in Crystals
  5. One Pack We R Memory Keepers White-Out Nonsense Rub-Ons (Brown)
  6. One Pack Glitz Designs Rub-Ons (Paisley Flourish)
  7. One Sheet Bo Bunny Cardstock Stickers (Sweet Baby Girl)
  8. One Sheet Bo Bunny Cardstock Stickers (We R Family)
  9. One Sheet Bo Bunny Cardstock Stickers (Will Travel)
  10. One Sheet Bo Bunny Cardstock Stickers (Star Struck)
  11. One Sheet Bo Bunny Cardstock Stickers (Keep us Together)
  12. One Pack K&CO Branda Walton Rub-Ons & Gems (Sweet Talk)
  13. One Pack Making Memories Flower Patch Clear Dimensional Stickers
  14. One Pack Prima Marketing Little Darlings (Chick)
  15. One Pack Prima Marketing Little Darlings (Bunny)
  16. One Pack Prima Marketing Fiesta Flowers
  17. One Pack DCWV Textured Cardstock Posies (Blues)
  18. One Pack DCWV Textured Cardstock Posies (Pinks)
  19. One Pack Bo Bunny Bodacious Brads (Buttercup)
  20. One Box Daisy D's Chipboard Titles
  21. One Jumbo Ranger Ink Archival Ink Pad (Jet Black)
  22. One Jumbo Ranger Ink Archival Ink Pad (Coffee)

Phew... what a candy eh! Now here are the rules:

Please leave a comment on this post, only one entry per person!

Post a link about this blog candy on your blog or website and don't forget to leave the link of your blog, and if you don't have one, just spread the word out ok!

I'll pay for shipping anywhere in the world so everyone could participate! I will be using Random.org to draw the lucky winner. This yummy candy ends July 21st!

Goodluck people!

Now here's a peek at the next blog candy... This is just a peek ok?! You'll have to subscibe or follow our blog to know what my next candy is all about!

My next candy has won this award in 2008, it's a personal favorite of mine and to many other stampers out there! Can you guess what it is?!


Lasly, I've got a little something to share with ya'll I must admit that due to the moving, remodeling and maintenance of the store for next month's releases I haven't really had the time to sit down and create! I made this little card earlier today. I just had to create something, anything so this ones a little rusty but I'm still glad to have ended up making something!


Hugs,
Photobucket

Cricut Tuesdays with The McSmitty Girl

Hi Everyone!

Summer has arrived and I hope it is as beautiful as it is where I am and that you are getting in some 'sun' time! This will be another quick inspirational tutorial. I will be creating a Baby Card and Pre-Designed Layout Pages for my cousin and his girlfriend as they are expecting their child. For the layout pages, I used the New Arrival cartridge.


Tip: If you are making these type of pages as a gift, a great default size to create photo mats that are industry size standards like wallets, 3x5 , 4x6, 8x10 etc... The recipient does not need to trim the photo to make it fit onto the page which results in a quick and easy assembly on their part. Plus they feel they had a part in designing the overall look of the layout page.


Now, let's get started... For my gift I will be using 12x12 pages because I am able to fit standard 4x6 and 8 x10 photos onto the page and in multiples as well (for 4x6 size).


*For all the pages I trimmed the background cardstock (cream) sheet to 11-1/2 x 11-1/2 size because I wanted a trim color of my background cardstock (pink) sheet to be seen inside the frame. Also, I trimmed a piece of 2 x 12" strip of patterned paper and border punched the one side. Essentially these can be hung together or separately depending on the decor and space. When creating these pages, I wanted to ensure each frame can be on its own if desired.

  • The 'Sweet Pea' page:

Cut [swtpea] with the Shadow creative feature using Fit to Length cutting mode setting the dial size @ 11-1/2". This will result in a cut that is 2-1/4" in height.

Repeat cut with the Blackout feature setting the dial size @2-1/4" (make sure your Fit to Length button is off).

  • Repeat cut with the standard set creative feature. You do not need to adjust the dial size.
  • Nest and adhere all pieces together and place onto page.
  • Cut [elphnt] with the Shadow creative feature @ 2".
  • Repeat cut with the Blackout and standard creative features.
  • Cut [elphnt-s] at its standard creative feature (do not adjust the dial size).
  • Nest and adhere all pieces together, then repeat steps 5 thru 8 for the other animals shapes. For my project I used the [monkey], [bear], and [girffe] but they are many other images to chose from like trains, other animals and other modes of transportation

The 'baby' page:

Cut [baby] with the Shadow creative feature using Fit to Length cutting mode setting the dial size @ 11-1/2". This will result in a cut that is 2" in height. (Tip: Save the positive pieces from this cut; you'll see why below).
  • Repeat cut with the Blackout feature setting the dial size @ 2" (make sure your Fit to Length button is off and save these positive pieces as well).
  • Repeat cut with the standard set creative feature. You do not need to adjust the dial size.
  • Nest and adhere all pieces together and place onto page.

The 'Little One' page:

Cut [littleone] with the Shadow creative feature using Fit to Length cutting mode setting the dial size @ 11-1/2". This will result in a cut that is 3-1/4" in height.

Repeat cut with the Blackout feature setting the dial size @ 3-1/4" (make sure your Fit to Length button is off).
  • Repeat cut with the standard set creative feature. You do not need to adjust the dial size.
  • Nest and adhere all pieces together and place onto page.
  • Cut [feet] using the Shadow and Standard set creative features each @ 2".
  • Nest and adhere all pieces together and place onto page.
Voila... Ces't fini! As you can see there was a common theme throughout my cuts. Layer, layer and layer. Also I used the following techniques to give my pages a consistent look and overall more definition such as:
  • Using the same color of cardstock papers.
  • Mix and Matching the same patterned papers throughout the project.
  • If you are using a punch for corners or borders, use those same punches on all pages.
  • Use the scraps from the cuts to create a coordinating card (see below).
  • Use a pen marker to define character features on the animals.
  • Add pop of color onto one page but that coordinate well with the overall look of the project.


Now here are my instructions on how I created the coordinating card (finished size 6-1/2 x 5"):

  • Using the Beyond Birthdays cartridge, cut a [rectenvl] using the Fit to Page cutting mode. This will result in a cut that is 7".
  • Trim a piece of cardstock to 6-1/2 x10" then score and fold @ 5". You now have a rectangle shaped card.
  • Using scraps from the layout pages created; I trimmed pieces of patterned paper and cardstock at least 6-1/4" wide.
  • Use the same border punch as with the layout pages and bottom punch the cardfront as well as the strips of cradtstock.
  • Arrange and adhere your patterned papers and cardstock as desired.
  • Place a ribbon trim if desired.
  • Use the positive pieces from the 'baby' page to adhere onto your card. You will find the pieces create a shadow effect which will pop out from the card.
  • Stamp a sentiment if desired.
  • Embellish card as desired.
Now how easy was that? And now you're done. Consider for your next project when making gifts to use all the bits and pieces leftover from the main cuts. Beyond cards you can create tags, card confetti and so much more.

I hope these projects inspired you to create your next gifts from paper and your Cricut. It is so much fun to do. Until next week... Happy Crafting!

p.s. Congrats to my Cousin Andrew and his Girlfriend Joanne on the arrival of their 1st child!

Monday, June 29, 2009

Dive Into Summer ~ Jackie's Creations

Dive into summer with the wonderful patterns and colours in the fun and fresh paper pack from Fancy Pants Summer Soiree Collection! I love the bright colours, and the floral patterns!

This first layout is of my family's favourite place to camp, Moberly Lake!! It has beautiful campsites and the area is breathtaking! Now first of all I distressed my base piece of cardstock. I then used my border punch on a smaller piece of plain cardstock and I only punched two edges. Next I inked the edges of my fun title and glued that and my photos to my layout.

I added a fun rub on also from Fancy Pants Designs Summer Soiree Collection. Then I added three little one inch squares of patterned paper some buttons and voila a fun layout of our favourite summer time getaway location!

Get your summer layouts under way and document all those precious memories from your favourite out door activity to messy faces from those tasty popsicles! Posh Designs Scrapbook Store has all the fun papers you need to document those precious summer time memories!

Check out the fun paper stack from Imaginisce - Summer Cool Paper Pack or click here to check out all the yummy printed paper packs!


This next layout is of my Niece and Nephew playing at the park on the slide!To make this layout first I used my border punch on one side of my title, and my base piece of cardstock. Then I glued my photos and my title to my base piece of cardstock.

I then added a pretty flower from Prima Flower Frillies - Yellow these flowers are so pretty and at just $2.99 a package you will want one in every colour! Next I added the word play with BoBunny chipboard letters. And a cute little bracket from Making Memories Felt Alpha Stickers - Green! I then added cute buttons from Basic Grey - Lime Rickey Buttons as bullet points for my journaling!


I hope you enjoyed today's projects! Until next time Happy Scrapping!

Friday, June 26, 2009

Fanciful Fridays - The flowers of summer!

"The rose speaks of love silently, in a language known only to the heart." author unknown

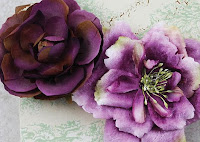
The image of a rose evokes many images, mostly those of beauty, love and kindness. Posh Designs is proud to present the latest in Prima's line of their gorgeous rose collection. Four styles to chose from, there will always be one to suit your project.

The Trellis Rose (top left) is the most stately of the four. Beautiful, timeless and a true classic. A wonderful addition to wedding LO's and shadow boxes. Clean lines and colours, the ivory is a must have!

The Fleur Danseur (right) brings to mind tulle and tutus, the world of ballet and symphonic sounds emanating from stringed instruments, echoing through an auditorium to the delight of little children. I love the orange hues of the Pirouette.

The Baroque Blooms (left) are majestic in their size and glory. Bold in their presence, these are not for the meek or faint of heart. These are flowers with purpose and a destiny to fulfill. The plum is such a regal colour don't you think?

"True friendship is like a rose. We can't realize it's beauty until it fades." author unknown


And lastly, the Gallery Roses (bottom right) are fun and flirty, they pop with colour and pattern. Taking their cue from rainbows and paint palettes they are a swirl of colour ready to delight your senses and add that extra zing to your project. For me the Marcel reminds me of being a kid and getting those swirly coloured balloons!

After all this there's one more thing, not only are these flowers absolutely gorgeous, they are only $3.99! Now where else can you get roses for that price?

So we hope you'll take a look and bring home some flowers today!

Tuesday, June 23, 2009

Cricut Tuesdays with The McSmitty Girl

Hello there and welcome to another edition of Cricut Tuesdays!


Well Summer has finally arrived and you know what that means... Long Weekends, Spending Time Outdoors, Enjoying Warm Weather, and hopefully Spending More Time with Family and Friends (i.e. BBQs, Parties, Weddings).


So this week I would like to show you some paper crafts you can create with your Cricut using the Life's a Beach cartridge.


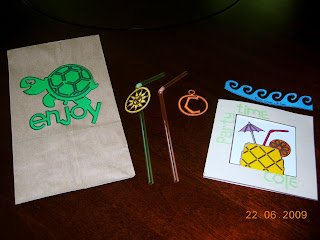
Invitation (finished size: 5" square card):


  • Trim cardstock to 6x12".
  • Set size dial to 5".
  • Insert Cricut Marker color of choice.
  • Press 'Square Card' creative feature, then the 'PineapDrnk' shape (with the letter 'P') and press Cut.
  • Once image has been drawn, press Load Paper, switch out the marker for your blade assembly, press Repeat Last (card image will now be cut within the marker drawn lines)
  • Unload paper, score in half.
  • Color in parts of card as desired.
  • For the words 'party time cole' (as my example), set size dial to 0.75" - pressure: low - pressure and blade accordingly to paper weight (see Cricut Lounge for more info on paper weights in relationship to cutting with your Cricut); then press 'shift lock' and key in each letter to create your phrase.
  • Adhere letters to card as desired.
  • Trim cardstock to 3-1/2" square to adhere to the inside of the card or the shape will show through the card itself.

Tip: Unfortunately this cartridge does not have layering parts for the square card creative feature. So use light colored paper so that coloring can be quick and use different colors for a more dimensional effect.


Food Labels:


  • Trim cardstock strips to 6 x 1.5".
  • Load in Cricut Marker.
  • Press Border creative feature then your image of choice (for my example I chose the wave).
  • Set size dial to 1-1/4", press Cut.
  • Once image is drawn, press Load Paper.
  • Switch out marker for the blade assembly, press Repeat Last then Cut.
  • Write in the food dish name, adhere a toothpick in the centre (believe it or not I had none when creating these projects) and place on top of food.

Straw Charmers (like wine charmers):


  • Trim cardstock pieces to 3" square.
  • Press Charm creative feature.
  • Set size dial to 2", choose image then load in a Cricut Marker.
  • Press Cut.
  • Once image is drawn, press Load Paper
  • Switch out marker for blade assembly, press Repeat Last.
  • Insert charm to straw from the bottom and adhere with tape on back
  • The 2" size is perfect for your standard straws you find in most stores. For jumbo straws, try 2-1/2" or larger depending on your straws.
  • For the letters, press the Shift key - for images, they are set to the non-Shift key.

Favor Bags:


  • Trim cardstock to 5 x 5".
  • Press TitleWords creative feature.
  • Set size dial to 4", choose image (for my example I chose the turtle which already came with the word 'enjoy'), then load in a Cricut Marker.
  • Press Cut.
  • Once image is drawn, press Load Paper.
  • Switch out marker for blade assembly, press Repeat Last.
  • Adhere image onto paper bags or favor bags of choice.

Tip: You can load in your Cricut Marker anytime before you press Cut. If by chance you actually make a cut first; no worries... Once your image is cut, press Load Paper, switch out the blade assembly for the Cricut Marker, press Repeat Last then Cut. Just don't forget to switch out the marker for the blade assembly ready for your next project!


These are so super easy to do and can add great themed effects for your Summer Party! Have fun. Until next week... Happy Crafting!

Friday, June 19, 2009

Fun Fridays - Summer Specials, come and get 'em!

This month is all about getting ready for summer. It's time to break out your checklist of summer scrapping essentials at unbeatable prices. We're talking under a toonie people!!! For those south of the border or even across the pond, that's under $2!!! There's not much you can get for that price these days, so scoop up the deals while you can!

We'll start off with some bling :

Basic Grey - Bling it Gems $1.80 ( left)
Basic Grey - Opaline Pearls $1.80 (top right)
Bazzill Basics - Adhesive Multicoloured Jewels $1.99

Move on to stamps and masks :
Tim Holtz - Mini masks $1.99 (left - floret shown)
Inkadinkadoo mini stamps $1.99
And finish off with some great rub ons :
Daisy bucket rub ons $1.49 (shown right)


So fill up your cart with great items at great prices! You can't go wrong with a bit of bling, a floral mask and colourful rub ons to finish off your pages. Happy scrapping!

Wednesday, June 17, 2009

Thursdays with KlDezign

Bonjour les filles!

Cette semaine sera vraiment un tout petit message car je manque un peu de temps j'ai encore des problèmes avec ma cave!

Alors je vous présente ma page Le carrosse de Madame! (Je sais il y a une faute d'orthographe... Grrr)

Ma page est faite avec les supers papier Fairy of Them de Imaginisce et je les ai mis sur un carton Core'Dination avec un dessus blanc à sabler! Elle a fière allure ma poule non?


Je vous reviens la semaine prochaine plus longuement!

Bisous

Kim @ KlDezign

Tuesday, June 16, 2009

Cricut Tuesdays with The McSmitty Girl

Hi Everyone!

Are you ready for Father's Day? It is just around the corner and if by chance you have not created your cards to honour your Dad or Father; here are some examples to help you get started.

Now these cards were created for my Husband - one from me and other from our Son. Warning to Hubby... If you are reading this, please act surprised on Sunday!


Card #1: 'Happy Father's Day to my Wonderful husband' ~ finished size 6" square
  1. Cut cardstock to 6x12", score @ 6". Corner punch all corners.
  2. Cut patterned paper to 5-3/4" square. Corner punch all corners.
  3. Using the Calligraphy Collection cartridge, cut phrase at 3" using the shadow and standard set creative features.
  4. (optional) Stamp words or other images related to Father's Day.
  5. Arrange & adhere 'Happy Father's Day' phrase plus any other stamped related images if applicable.

For my card, I embossed the greeting so that it can stand out against my busy looking patterned paper. I also chose to use my corner punch for additional detail and finish to my card; this is optional and you can use a variety of punches as well.

Card #2: 'DADDY you're a superstar' ~ finished size 5" square

  1. Cut cardstock to 5x10", score @ 5". Corner punch open flap to card.
  2. Cut patterned paper to 4-3/4" square. Adhere onto card front.
  3. Take white cardstock and draw star images using the George and Basic Shapes cartridge (creative features used are standard and silhouette) @ 1".
  4. Adhere star drawn patterned paper onto cardfront trimming it down to 3".
  5. Border punch colored cardstock cut at 1-1/2 x 3" and adhere that onto the star drawn patterned paper.
  6. Using the Sans Serif solution cartridge, cut letters 'D-A-D-D-Y' @ 1" (no creative feature used).
  7. Using the Street Sign solution cartridge, cut letters 'y-o-u-'-r-e-a' @ 0.75" using the standard creative feature and different color cardstock.
  8. Cut letters 's-u-p-e-r-s-t-a-r' using 1 additional cardstock color and the creative features, standard and shadow. All letters cut at 0.75"

For my tips on how to create to background patterned paper using your Cricut markers as well, please refer back to a previous post by using the search engine - Cricut markers. Also you can find my additional tips and tricks by visiting the Cricut Lounge inside the Interactive Community such as understanding the relationship between cardstock weight - speed - pressure and blade depth.

Card #3: 'to a Wonderful DAD and father' (created especially for my FIL from us) ~ finished size 6" square

  1. Cut cardstock to 6x12". Score @ 6".
  2. Cut patterned paper to 5-3/4" square and adhere to card front.
  3. Trim vellum to 6" square.
  4. (Optional) Stamp chosen images complementing your card. Adhere onto card using adhesive spray (so that the glue does not show through).
  5. (optional) Stamp greeting or other complementary words or images and trim to go onto card front.
  6. Using the Beyond Birthdays cartridge cut out the word 'DAD' @ 3" using the creative features standard and shadow.
  7. Arrange & adhere all pieces onto card front to finish.
  8. For this card, I chose to use glue pop-up dots to emphasis the word 'DAD' in honour of Father's Day.

So there you have it. 3 quick and easy cards that can take less than an afternoon to prepare, cut and finish! Should you have any questions or comments, please feel free to leave them below or contact me via the Interactive Community!

And to all the Dads and Fathers out there... Happy Father's Day to you! May you enjoy your day whatever you are doing and hope you are sharing it with loved ones.

Until next week! Happy Crafting!

Sunday, June 14, 2009

Pretty Pearls And Ribbon Galore ~ Jackie's Creations!

Today I am going to share a layout of my Daughter and her Best Friends!First I distressed my base piece of cardstock, and inked it up a little. Then I applied a square of patterned paper, the paper is from DCWV - Citrus Stack! This paper stack is full of fresh pretty patterns with a hint of glitter the perfect choice for this fun funky project!

I then added my photos leaving a little portion unglued making them into pockets for my journaling cards. I left two spots for journaling cards so my Daughter can dedicate one journaling card about each of her friends!I then added some fun chipboard flourishes and a pretty flower all are from BoBunny!Next came my title first I distressed and inked a small piece of yellow cardstock then I added a die cut from Making Memories - Bohemia Line and some chipboard letters.

Now for the strips of ribbon....to achieve this effect I used my craft knife and cut two little strips from my cardstock. I then tied ribbon around it all the way down the strip!Then I added a gorgeous butterfly diecut from Crate Paper - Mia Line, for some added bling I added some pearls for the body of the butterfly!Next to finish off the layout I stapled a strip of yummy ribbon from Pink Paislee - Sweet Cakes Line!

I hope you enjoyed today's project, until next time Happy Scrapping!

Friday, June 12, 2009

Fun Fridays - Summer holidays here I come!

Has summer hit you yet? For us in Montreal, summer played a cruel joke on us and went from cold to warm very quickly and then we proceeded to have spring. Wet and cool have been the order of the day for a few weeks now, but I'm noticing a warming trend in the next week. I sure am hoping it sticks around as I'd really like to spend more time outside enjoying the sun and warmth.

I know for some of my friends they have already started planning their trips to their cottages up north. I'm really hoping that I'll have a chance to go camping this summer, even if for only one weekend. It's been years since I've been, granted, I'd have to hit the local Canadian Tire to pick up camping supplies as I'm down to nothing since my dad gave away the tent I always used. When I moved from T.O. I got rid of the rest of my supplies, Sheesh, that's 10 years, I guess it really has been awhile.

I do have weekend getaways planned though, at least one in July. And for that I'll need proper vacationing scrap supplies. Hopefully you've checked out the Making Memories Great Escape line. If you haven't you really should. A very well priced line, starting at $1.99 and only going up to $5.99, which leaves more money for actually getting away from home for a bit!

Totally cute, totally fun and like I said, totally AFORDABLE! You're covered from paper to stamps, funky eco cork and bamboo lettering (seen to the left) to tags, tape and rub ons. I've already placed my order and I expect they'll go fast. Get them before you head out to your vacation destination and before everyone else scoops them up!

When you're done scrapping with this great line, don't forget to post pics up over at the community site. Can't wait to see you there.

Wednesday, June 10, 2009

Thursdays with KlDezign

Bonjour tout le monde! Ça va?

Je vous montre une page que j'ai fait avec une des pages que j'ai créé la semaine passée.

(Je croyais avoir le temps de faire les 5 mais j'ai manqué de temps finalement!)

Alors voici ma page nommé 1 ride. Je n'ai pas mis beaucoup d'embellissements car le papier de fond est déjà assez chargé comme cela. J'ai ajouté quelques rub-on de la collection Mommy and Me de Prima et une énorme fleur pliée en deux de Prima encore et voila le résultat!


Mais par contre je vous montre ma nouvelle page que j'ai fait avec les supers papiers de la collection Lime Rickey de Basic Grey. Pas besoin de le cacher oui je suis fan de Basic Grey, j'achète tout leur stock! (Au grand plaisir de mon cher mari!)

De plus quand ils sortent une collection de papiers, ils sortent en général les brads, les brads glazed et les boutons, tout ce qu'il faut pour une acheteuse compulsive comme moi qui aime tout ce qui matche! Mais avouez que ça en vaut la peine non?


Bon on se revoit la semaine prochaine et avec un peu de chance j'aurai des pages faites a partir de mes photos de mariage!

Bisous

Kim @ KlDezign

Tuesday, June 9, 2009

Cricut Tuesdays with The McSmitty Girl *Delayed*

Hello Everyone and Happy Tuesday!

Last week I discussed about the awesome effects you can do with the layering technique using your Cricut machine. This week I would like to add another awesome effect you can do with most Cricut cartridges and that is to mix and match your lettering for your titles, journalling or punctuation, etc...

Below are a few key pointers for the different machines out there when wanting to try out the Mix and Match technique.

  1. If you are using 2 or more cartridges for your lettering you can either: a) Cold Swap your cartridges in and out (i.e. to interchange them while your Cricut machine is turned OFF) or you can use your Cricut Jukebox and load in as many cartridges (up to 6 per unit) ensuring the Jukebox is connected to your Cricut machine.

  2. You can only cut one size at a time.

  3. You can only mix and match with one cartridge at a time, even if connected to the Cricut Jukebox.

  4. For the Original Personal machine there is no mix and match cutting mode. In order to mix up your lettering you will need to type in all characters for every single font style, then press cut and repeat until done.

  5. For the Create and Expression machines utilize the 'Mix and Match' cutting mode. How?
  • Press the Mix and Match button ON (i.e. green light will show when turned on).

  • Key in all your characters for the one font style.

  • Select your next cutting feature, then type in your next set of characters.

  • Repeat until done.

Mix and Match your lettering is so much fun and can add that special touch or extra emphasis where needed. Here are some examples of how I used the Mix and Match cutting mode on my projects:

Photobucket

For this layout page titled, '18 mths going on 18 yrs' I used the Sesame Street font cartridge. The creative features I chose for the characters 18 mths & 18 yrs was Sunny Day (and its shadow counterpart) cut at 1-1/4". 'going on' was cut using the Blackboard creative feature at 0.75" in height.

The next layout page titled, I'm NOT impressed Dad.' was created using the Lyrical Letters cartridge. All the words except for 'NOT' was cut using the Italic Monotype creative feature while the word 'NOT' was cut using the Jumbo creative feature. Most of the letters were cut at 1" except for the letter 'a' (actual height is 1-1/4") in the word 'Dad' because I wanted to emphasis that word but not making too obvious in doing so.

Photobucket

My last example is a layout page titled, 'the next Canadian Handyman Superstar'.

Photobucket

This particular example was created using 3 cartridges; Street Sign, Plantin Schoolbook and All Mixed Up. To keep proportions as close as possible, all the letters were cut at 1" and no shadowing was used on any of the letters because there was so much detail already using different font styles.

So now that you've seen what is possible, try this technique and cutting mode on your next project. And while your Cricut machine is on, try...

  • Mixing and Matching your papers by using other complementary colors and/or patterns taken from your layout page.

  • If using 1 height size, you can use markers as another detail to add to your projects.

  • Vary your heights in your lettering to give emphasis to key words (a la the 1st example).

  • Layer on its shadow, blackout and/or shadow blackout creative features if appropriate to your project.

The best part of the Cricut system is that most of the cartridges are designed with more than 2 font styles - a great bang for your buck! Should you need any assistance with this topic or any of my previous topics and/or projects, please drop me a line or a comment below. I'd love to hear from you!

Until next week... Happy Crafting!

Monday, June 8, 2009

Prima CHA Summer 2009 Releases *Updated*

Hey everyone!

Are you ready for Prima's hot new summer releases products will be available at the end of this month! YAY :)

In 48 hours Now you should be able to preorder them on our site!

Click Here!

Below is a sample of what we've plucked:


Baroque Blooms:
Add a touch of elegance to your project with these luxury layered flowers. Two blooms per package, one with a velvet-like finish, the other with a soft fabric. Four beautiful colors available.

Fleur Danseur:
Add a touch of elegance with these delicate French inspired blooms. Sheer fabrics mixed with touches of tulle and metallic center kisses. Six stunning colors are available.

Trellis Roses:
These feminine and dainty finished roses are complete and ready to be used right on your project as-is. With these being a smaller version of your typical rose, there are even more versatile ways to use them...everything from scrapbooking, cards to home decor and mixed media! Available in six lovely colors.

Sunday, June 7, 2009

Precious Petals ~ Jackie's Creations

After a fun afternoon at the park and a loaded memory card I knew I had to make a layout of this sweet photo of my niece Chloe! And the perfect paper for this project was the super sweet paper from Basic Grey's Eva Collection. I love this collection the pages are in all of my favourite colours and remind me of a gorgeous bouquet of flowers! Make sure to check out all the Printed Packs that are available in the store there is enough paper to choose from and they will make your heart sing!

First, I tore a strip of pink cardstock and crumpled it up a bit and sanded it to give it a nice distressed look! This technique works great if you are using cardstock that has a white core like Core'Dinations Whitewash Cardstock! I then cut a strip of a different patterned paper from Basic Grey's Eva Collection and distressed the edges and when I glued this to my layout I left a small space on top where I did not apply any adhesive making it into a pocket to hold my journaling card.

To finish off the layout I added some pearls from Kaiser Craft, my title, a cute quote and a super sweet flower from Pink Paislee's Fabric Petals from their Winsome Enchanting Collection! These precious petals are so cute you will want to pick up a pack of every colour! And at this price you believe me you can!


Until next time Happy Scrapping!

Friday, June 5, 2009

Fun Fridays - Welcome to June!

It's June! Yay! Do you know what that means? The official start of summer is almost here, I've been waiting for a long time for it to arrive, I LOVE summer!

Do you know what else I love? Fun, fresh summer scrapbook kits! And of course, Nini has outdone herself again! The woman really is a mistress of scrapping fun when it comes to putting together great kits.

Check out the new
K & Company Citronella Scrapbook lot . Once again she's managed to pull together a slew of great products from this line and put them in one amazing lot! A value of over $120 CDN, you can own this lot at aprox. 35% off the regular retail value. At only $79.99 you'll get the following amazing products in the lot :

  • 28 sheet 12 X 12 paper pad
  • 18 linen textured 4.75X6.75 mat paper pad
  • Citronella Journaling Pad
  • Citronella Tag Pad
  • 128 Sheets Citronella Alpha Tear Pad
  • 1 Package Citronella Die-Cut Cardstock
  • 1 Package Citronella Layered Floral Accents
  • Citronella Clear Stamp Set
  • 1 Package Citronella Rubber Charmers
  • 1 Package Citronella Rubber Charmers
  • 1 Package Citronella Vellum Alphabet Stickers
  • 1 Package Citronella Word Embossed Stickers
  • 1 Package Citronella Words Adhesive Chipboard
  • 4 Packages Citronella Grand Adesions
Now that is a LOT of goodies all in one place! I own a number of K & Co. products and if you haven't ever used them before, you're going to love them. They are great! The papers are gorgeous and the embellishments make your heart sing! It's one of the lines of products that I'm always happy to see and have in my stash. There's only 3 left so get them before they're gone!

Maybe you love the idea of the scrap kit but the price is a little more than you have right now, that's ok! For those that might be on a slightly tighter budget, never fear, Nini won't leave you hanging.

Check out the new
June mini-kit. It's an absolute steal at only $19.50! It comes loaded with goodies too. Perfect for your smaller summer albums, the colours are fresh, the embellishments are cute and simple and you'll love that everything is ready to go, just like you on those warm summer days!

  • 36 Sheets 8X8 Flair Designs Hit the Beach Paper Collection
  • 1 Sheet Clear Flair Designs Summer Daze Cardstock Stickers
  • 1 Sheet Flair Designs Clear Stickers
  • 1 Package Flair Designs Summer Daze Clear Shapes
  • 1 Package Flair Designs Summer Daze Trims
So get them while they're *hot* and before everyone else beats you to them! Happy Scrapping!

Wednesday, June 3, 2009

Thursday with KlDezign

Bonjour les filles!

Quelle magnifique journée ce fût mon mariage vous pouvez même pas imaginer!

Aujourd'hui je vous montre quelques technique de mon cru. Vous savez, nous sommes en récession et je lis souvent des "moi ou mon conjoint, nous arrivons serrés, un de nous avons perdu notre emploi".

Bref les articles de scrapbooking coutant parfois cher, (même si Nini nous fait de très bons prix!) Il est parfois intéressant d'économiser en utilisant ce que nous avons sous la main...

Alors je vous montre 5 techniques pour faire vos papiers à motifs vous-mêmes.

ATTENTION; les techniques démontrées sont économiques si vous avez déjà les matériaux sous la main et non si dès que vous voyez comment faire vous allez vous les procurer! (Je suis comme ça moi!)

La première technique
La plus facile, la plus accessible à toute, c'est de récupérer des vieilles retailles de papiers que vous avez, si elles sont de la même collection c'est encore plus facile! Si elles ne sont pas de la même collection essayer d'en trouver dont les couleurs ne jurent pas trop. Ici j'ai utilisé des retailles de la collection Twitterpaed (Imaginisce), Prima, et un cardstock de Stampin'up. J'aurais aussi pu faire des coutures aux "joints" de mes papiers et ça lui aurait donné totalement un autre look. Même chose si mes papiers n'aurait pas été si bien coordonnés j'aurais aussi pu encre les bords de chaque petits carrés de la même couleur pour unifier.

Mes scans ne sont pas à tout casser par contre j'ai manqué de temps!

La deuxième technique


Let's get dirty les filles! Hé oui c'est le temps de se salir les doigts! Récupérez vos journaux, je vous conseille les petites annonces car vous ne voulez pas avoir comme fond de page un crimniel récidive et tue 2 personnes... Découpez vos petites annonces de facon à recouvrir votre page au complet. C'est déjà bien; mais je vous suggère de la vieillir pour lui donner un look agé avec de l'encre Distress de Tim Holtz. Vintage Photo et Tea Dye pour le brun, et j'ai encré certaines places en noire pour un look vraiment "magané".

La troisième technique

Pas très bien réussie pour moi mais la technique en tant que telle est très bonne. J'ai pris plusieurs étampes que j'ai étampée de manière aléatoire avec de l'encre à embosser. J'ai ensuite embosser avec les encres Tim Holz pour ensuite recouvrir avec la poudre à embosser Distress. (Peeled Paint) Ensuite j'ai sablé l'excédent de poudre et encré avec les encres Distress encore. (Peeled Paint, Tea Dye). Avec un mini-mister remplis d'eau j'ai aspergée ma page qui a donné cet effet. J'essayerai de nouveau car le résultat ne me plait pas à 100%.


Quatrième technique


Assez facile, j'ai utilisée les masques de Tim Holtz (je vous ai déjà dit que j'étais une fan?). J'ai seulement appliqué mon masque et j'ai encré avec de l'encre Distress (Broken China) Ensuite pour donner un effet d'aquarelle j'ai aspergé avec de l'eau.


Cinquième technique

Non la moindre, mais pourtant très simple! J'ai étampé de façon aléatoire mes hiboux préférés sur ma page. (Sassafrass Lass) Quelques uns noirs et ensuite une sorte avec de l'encre Distress (Broken China) et ensuite avec de l'encre à embosser (Versamark) j'ai étampé ma dernière sorte d'hibou pour par la suite passer dessus avec de la craie bleue.

Alors voila 5 manière d'économiser un peu de sous. Venez me voir la semaine prochaine pour voir ce que j'aurai fait avec ces papiers!


Monday, June 1, 2009

Cricut Tuesdays with The McSmitty Girl

Hi Everyone!

This week's edition will focus on a technique already tried and true in the paper crafting world long before the Cricut arrived yet the Cricut can do as easily and quickly. The technique is called 'layering'.

Personally I love to layer; I think it gives my project the additional pop of color and dimension whether on a shaped image or with fonts and phrases.

Here are my tips and tricks along with some of my recent layout page (more to be found over at my gallery via the community site) showing you that layering with your Cricut no matter what kind of machine you have, is so much fun to do!


IMPORTANT: You do not need to adjust the size dial when you are layering parts of the one image. All of cartridges are designed so that all images will cut proportionally to each other thus making layering easy and quick to assemble your image. If you use the real dial size, all images will cut out exactly at the size chosen and therefore will not layer properly together.

Tip #1: Try to layer in as many creative features as possible where it is appropriate for your project. Use different colors of cardstock and/or mix in patterned papers with solid cardstock for an unique look. You can apply this tip to all the images on every cartridge (i.e. letters, phrases and shapes)!

Example #1: You see the LO title? Well that was created using a creative feature plus the standard set image found on this particular cartridge and its layering counterpart. I used 3 different colors of cardstock to make this title and love how it just complements my layout page yet pops from it all at the same time.


Example #2: Check out the flower image on the layout. It was layered using 2 patterned papers from the same collection yet in light and dark color. For this page, I chose to layer with the darker color pattern being more dominant but you can choose what ever combination suits your project and style best.


Example #3: Try layering your journalling mats. I've used a basic shape, a circle to complement my page yet chose 3 papers - 2 solids and 1 pattern for that added pop and dimension. Since I've used the same pattern to anchor my photo; I transitioned to the jounalling by using the same patterned paper.

Tip #2: Try to layer different font styles on top of each other.

*In the PDSS Interactive Community I have seen this technique frequently used with amazing results. It was my inspiration point for me to try and document this technique for this week's blog ~ thank-you ladies!

The above tips are the foundation for your layering applications with your Circut. So why not try...

  • Using your Cricut Markers to outline your images
  • Different cutting materials such as foil, vellum, chipboard or vinyl
  • Finding added resources via your scrap pile
  • Applying these tips onto other handmade creations such as tags, envelopes and so much more

Well I hope I have inspired you to take another look at layering. At least it worth a try since your Cricut machine is already on and/or in use, right? Layering does not have to basic anymore. Have fun experimenting and until next week... Happy Crafting!


Blog Design By Sour Apple Studio © All Rights Reserved.