Nos membres - Our peeps

Wednesday, April 29, 2009

CHERRY ARTE 25 CENT SALE ~ CHECK IT OUT

Hey everyone we've got a fabulous sale going on! Only 25 CENTS on all Cherry Arte Double Sided Gorgeous Patterned Papers, yummy Rub-Ons and sweet Chipboard Accents!!!

For the best selections head on over to Posh Designs NOW!!! You wouldn't want to miss this!

Go, go, go!!!

Thursdays with KlDesign

Bonjour tout le monde!

Ça va cette semaine?

Je n'ai pas pu faire beaucoup de scrapbooking cette semaine je dois l'avouer, je manque royalement de temps, mais au moins c'est payant, mes préparatifs pour le mariage avancent à grands pas! Alors prenez votre mal en patience j'aurai des pages géniales bientôt à vous montrer!

Donc j'ai 4 petites cartes de faite cette semaine à partir des superbes papiers Cosmo Cricket de mon kit de Dt. Vraiment, je l'ai dit la semaine passée et je le redis... Ils sont superbes!

Alors voici ma première carte ou je voulais utiliser ma girafe que j'ai reçue fait à partir de bling. J'adore le bling ce n'est pas un secret et comme je voulais la faire resortir le plus possible j'ai décidé de la mettre en relief non pas sur le dessus de la carte comme à l'habitude mais plus en dessous, l'effet est très réussis en vrai car elle ressort très bien.
J'ai utilisé le même procédé pour ma deuxième carte avec des retailles qu'il me restait de tout les petits projets que j'avais réalisé. Alors avec tout ces petits morceaux j'ai pu créer une jolie carte d'anniversaire que j'offrirai à mon moi-même dans 2 jours. (Bien quoi? à défaut d'en avoir on se contente non?)

Cette carte est particulière car elle est vraiment étagée. C'est dommage car ma photo ne rend pas très bien la carte qui en fait mesure environ ,25 pouces d'épaisseur. Les coeurs sont le plus surèlevés ce qui donne un petit look chic à la carte.


Et la dernière et non la moindre, ma première "carte couche" La réalisation est très simple et plaira j'en suis sure à toute nouvelle maman qui vient de se faire offrir une dizaine de cartes traditionnelles. Découpez un grand triangle dans votre papier favoris, tracez-y un trapèze au milieu ou vous plierez les pointes des 3 nouveaux triangles ainsi créés. Rejoignez-les au centre. Ici j'ai décidé de les relier à l'aide d'un ruban que j'ai fait passer dans des oeillets. Une jolie étampe et le tour est joué! J'espère que la nouvelle maman en question sera satisfaite!

Et voila! C'est tout pour cette semaine déjà!

Je vous reviens donc sans fautes la semaine prochaine, plus vieille d'un an!

Bisous

Kim @ KLDezign

Fun with Madeline...

Hey everyone!

I feel like I've been out of the blogging world for so long! That's what happens when you have a fabulous design team who takes over and keeps you-all entertained with their gorgeous projects!
Today, I want to share with you two pre-made layouts I created using K and Company's gorgeous "Madeline" collection! Actually, this was my first attempt in creating pre-made pages and I hope you'll enjoy these pages as much as I had fun creating them! All the products used were from the "Madeline" line which is selling quite fast so if you want 'em now you better stop by store and get them fast before their gone!

Here's my first layout titled "Dream" I didn't have a scalloped circle shaped page to match this line so I used a sheet from a another company and used it as a template! It didn't come out perfect *lol* which is why I inked the edges up a bit :) I punched holes and threaded a ribbon and bow-tied it at the bottom center of the page!

My second layout is titled "Love" hope you like it!

Here's what I used for both my projects:

Paper:

Embellishments:

Stickers & Rub-Ons:

Misc. Supplies (other than the Madeline line)

Tools:

  • We R Memory Keepers Crop-A-Dile Punch (which you can contact me to order I haven't restocked since they sold out *lol*)
  • Pop Dots
  • Fiskars Scalloped Edge Punch for the first LOs matting frame

On a side note, I have access to thousands of supplies from top brands with that said not all the supplies are listed on the site so if you have specific items in mind please do not hesitate to contact me for a custom order!

Until next time! Happy Scrapping!

Hugs,

Tuesday, April 28, 2009

Cricut Tuesdays with The McSmitty Girl

Hello Everyone and a Happy Spring Tuesday to You!

Last week was a pretty chaotic one as my Father-in-Law and my Step Mother-in-Law were preparing to move out from our home. I compare the act of moving to organized chaos. My husband compares organized chaos to my scrapbooking/cardmaking hobby. Needless to say, I agree with my husband. Like you would plan out your move, you plan out your page or card design. When you begin to pack up your things, you start to cut paper, photos and adhere. See what I mean? Before I get too far off track time was not on my side as you may have realized; but that did not stop me in creating 2 cards for occasions coming up in my near future.

The first card was created for my Sister in Law's Baby Shower. She and my Brother are expecting their second child but their first Son! Here are the instructions on how I created this card using the New Arrival cartridge.

Photobucket

  • Cut envelope first using the Fit to Page cutting mode (which was calculated at 5-3/4").
  • Using 'card-2' image, cut card on the blackout feature at 5-3/4", score and fold card in half
  • Cut 2 rectangle mats: 1 @ 5-1/2" x 4-3/4" and 1 @ 5-1/4" x 4-1/2", layer spaced evenly around and adhere onto cardfront (i.e. scallop edge forward).
  • Cut images 'stork' followed by 'stork-s' (using the shift key) both at 3".
  • Color in layers as desired and other parts on the original image as you see fit.
  • Cut images the 'nursery' and 'nursery-s' (using the shift key) both at 1-1/2".
  • Color and/or outline the layers as desired for interest.
  • Adhere the stork and nursery images onto the card as you would imagine a stork delivering a baby to thier new parents.
  • Trim ribbon to wrap around the card in the same direction as you are going to place the die cut images (For this card, I used tacky tape on the front of the card only to ensure it properly stayed in place then wrapped tightly as possible the ribbon around the card).
  • Stamp a greeting onto white cardstock, trim and adhere onto cardfront (I chose to use a pop dot in the case).
  1. Tip: When you would like to layer parts onto an original image make sure that this cartridge cuts images proportionally to each other. Most of the cartridges do so ensure you do not use the 'real dial size' cutting option on your Cricut machine. If you are not sure, refer to your handbook.
  2. Tip: Use white or cream colored cardstock when you would like to color in the layers that fit onto an original image. Once these layers are cut; you can color them as you wish and with your coloring tool of choice. For example, the 'stork' had layers of a hat and body and I chose to color them in for contrast for my card. Plus when layered together I chose to color in the beak, legs and feet of the stork as well for additional dimension.
The next card was created for my Husband's former work location as he got moved to another location (closer to home, yippee). Before he left his staff threw him a Good-Bye - Good Luck Tea. He was very moved by all the kind gestures and I created this 'Many Thanks' card for him to express his gratitude. Here are my instructions for you to re-create this card using the Opposites Attract cartridge:

Photobucket

  • Trim cardstock to 4-1/4"x 5-1/2", score and fold in half
  • Cut patterned paper to fit flush against the entire front of the card.
  • Using a piece of white cardstock (or a color of your choice), trim to 4-1/4" x 1" and adhere to bottom of the cardfront.
  • Place ribbon across the front of the card covering the seams from the white cardstock to patterned paper (For this card I used tacky tape to ensure strong placement).
  • On your Cricut cut the letters M-A-N-Y at 1" using the Upright creative feature.
  • Also at 1" cut the word 'thanks' using the standard set image (as a result this should be in a script type font found on the cartridge).
  • Place and adhere the letters and sentiment onto card.
And to think I've got to create one more card.... My Wedding Anniversary is this Thursday and I have nothing started. Like I said before my week as been organized chaos and this week will be no different as I go through the aftermath of a move especially since it involves loved ones.

I wish you a great rest of the week! Enjoy the Spring Weather and until next time... Happy Crafting!

Monday, April 27, 2009

Having fun in Jack's World ~ Jackie's Creations

I love giving gifts! And a pretty gift bag brings a smile to everyone's face! I am not sure if you are like me, but I have never decorated my own gift bag. Well one item in this months Design Team kit was a gift bag just waiting for me to decorate!

I cut the words and flowers on my cricut using the George Cartridge. I cut numerous flowers in different sizes and layered them and curled the edges to give a 3d effect! I then used a gorgeous brad from Basic Grey Glazed Brads - Offbeat Collection for the center of each flower!

And the gorgeous papers are from Cosmo Cricket - Jack's World! These papers are so cute and are perfect for all your projects about your little ones! Adorable monkeys and bears to smiling alligators!!


It only took one evening to make this cute little mini album and gift bag.I first covered the album cover and pages with super the cute papers from Cosmo Cricket - Jack's World I then trimmed the edges and chalked the edges with some brown chalk.

The cute ribbon is also from Cosmo Cricket - Jack's World. And to make my title I used funky chipboard letters by Bo Bunny.Next I added some pretty flowers by Bo Bunny as well, and a sweet little bird sticker from Imaginisce - Twitterpated - Bluebird .

I used the photo of my Daughter as a pocket to hide my journaling card. I then added some cute rubons also from Cosmo Cricket - Jack's World!

My little Nephew is such a little character the cute little monkey was the perfect rubon to add on this page! I also made his photo double as a pocket to hold my journaling card. I stapled some ribbon from the same line Cosmo Cricket - Jack's World onto the journaling card to give it a playful look. And the cute chipboard buttons are from Bo Bunny.

I ruffled some paper and applied it to the back of my photo using my new Glue Glider Pro Unit! You have to check out this Glue Glider it is so cool my new favourite adhesive!It is refillable and easy on the wallet, defiantly worth every penny!


I hope you enjoyed today projects, and until next time Happy Scrapping!

Friday, April 24, 2009

Fresh Fridays - April's last hurrah!

It's almost the end of April and most people I know are gearing up for summer. The weather is nicer and nicer every day, the sun is shining, the breezes are warm and we get to wear fewer layers each time we head out the door! I've already been out back in my private courtyard cleaning up the mess that fall and winter left behind. I can't wait to get my BBQ fired up!

But, before you get sidetracked by BBQ's and sunshine outings, don't forget to scrap your Easter and springtime pages! The last few days where it might be rainy or cooler are great days to spend some time scrapping, just don't forget to open the window a crack and pull back the curtains!

Start with American Crafts cardstock pack in gorgeous spring colours! Wonderfully textured and heavy weight cardstock which is a joy to work with. I was pleasantly surprised the first time I used it.


Add to it some beautiful Easter - Flower Patch rub ons by making memories for a touch of soft colour and flair.

If you're so inclined, check out the new stamps that are in stock now to add the finishing touch to your projects.

Five new Stampavie stamps for you to create and embellish your LO's are available for your stamping pleasure. Get them before they're gone! I know many people have been talking about stamping over on the community site, myself included. I've already put my order in!

So give in to April's last hurrah and scrap your spring and Easter photos before you get caught up in summer time fun!

Thursday, April 23, 2009

Thursdays with KLDezign

Bonjour tout le monde! Comment allez vous?

Cette semaine j'ai fait une tonne de pages mais je ne vous en présente que 3 pour la seule raison que je suis une "tease!" hihi, Non sans blagues, je n'ai rien d'intelligent à dire sur toute alors aussi bien faire comme si elles n'existaient pas!

Alors je vous montre ma première, J'avais dit que je ne referais pas de page de style Grunge tout de suite, et bien qu'à cela ne tienne, je n'ai pas de parole! J'ai trouvé LA photo qu'il me fallait pour réessayer ce style. Alors voici mon 2 essaie de style "Grunge" avec mon gars qui vous fait un doigt d'honneur. (Au fait j'ai le droit de mettre cela sur le net? Quelle vulgarité!)


J'ai utilisé du grungeboard, des masques de la peinture à craqueler et de la distress ink. Les papiers sont de Basic Grey, la collection Boxer. Pour donner un petit look magané j'ai fait l'utilisation d'agrafe de métal que j'ai mis un peu partout. Alors voici mon petit bonhomme de 4 mois prêt à aller en maison de correction.

J'ai reçu mon kit de DT hier... Ça n'a pas pris beaucoup de temps que j'avais déjà une page de fait, j'ai adoré ce qu'on m'a envoyé! Moi qui est en partant une fan de Cosmo Cricket cette collection est vraiment géniale, pleine de couleurs, inspirante vive, bref c'est une collection qu'il vous faut pour ce printemps! De plus j'ai utilisé les lettrage de feutrine de Prima qui donne un aspect tout enfantin à ma page. Avec ma cricut j'ai pu faire moi même quelques design afin d'ajouter un peu de texture à ma page. J'ai aussi fait quelques étampages que j'ai découpé par la suite. Les rubans donnent finalement une petite touche de finition ainsi que le chipboard de volute de la marque Bo Bunny. Alors voici ma page 3,2,1, Dodo.


Une dernière page afin de vous insciter à participer au blog Candy de Posh Design. Les couleurs de cette collection de WRMK sont géniales et les motifs sont tout simplement sublimes et inspire vraiment. Le lettrage et les swirls viennent de la collection Bo Bunny. Bref je vous laisse en juger par vous-mêmes. Au fait n'appelez pas la DPJ, mes enfants étaient tout à fait consentant de m'aider lors de notre ménage du printemps. AUCUN ENFANT N'A ÉTÉ MALTRAITÉ LORS DE CETTE SESSION DE PHOTO, ON A ÉCRASÉ UNE MOUCHE ET DAMIEN A VOMI MAIS C'EST TOUT.


Je vous laisse la dessus mes belles! Je retourne à ma vie passionnante de maman!

Bisous

Kim@KLDesign

Tuesday, April 21, 2009

Cricut Tuesdays with The McSmitty Girl

Hello and Welcome to another edition of Cricut Tuesdays with Me!

In honour of Earth Day (April 22nd) the following cards were created using scraps from my ever growing stash as well as re-using left over packaging from empty cereal and snack boxes.

The first project I created is a series of ATCs (Artist Trading Card) out of empty cereal and snack boxes. I purposely created 5 different cards but using the same background paper and main color of cardstock for consistency. The reason I called my ATCs a series is because I knew that making the same card over and over would result in mistakes and shortcuts as a result not all the cards would look the same.

To create these cards I had them cut in the 'rectangle-2' shape at 4" each using my George cartridge. Because of the thickness of the cardboard, I used the multi-cut feature set on to cut 2 times. Following with the patterned paper (taken from my scrap folders, another re-use of product) I cut the same shape as the cardboard to cover both sides. The card edges were then inked all around for a finished look (and to cover the cardboard thickness).

For each of the words I chose, I used both the Home Decor and Home Accents cartridges. All the words were cut using the Fit to Length feature to ensure its length was no longer than 4". As a result each image was cut at approx. 1-1/4" (again love how the Cricut figures that out for you). Then each of corresponding images were taken from the Home Decor cartridge all cut between 1 to 1-1/2". Depending on the image I used a base for all my images; the shadow blackout creative feature. I combined creative features to adhere onto my base using either the standard cut image and/or all 3 three which included the shadow creative feature for additional pop on the ATC.

*Note though that these cartridges are Solution based cartridges which basically means that the creative features are less than your standard cartridge and you may not have as many image options to layer or cut. BUT these Solution cartridges give you many creative possibilities to use them on your projects.

Once I nested the images together, they were adhered to the ATC in a spot not to interfere with the card's word. Lastly, I embellished with rhinestones for bling and used a gel pens on a couple for added detail. These were certainly fun to make and it makes great use of my scraps!


The next project is my series of Mother's Day Cards. Still wanting to re-use alot of my scrap patterned papers and cardstock, I made 4 cards to honour the moms in my life - my Mom, my MIL, my Step MIL and my BF all are whom great moms (but of course more biased towards my Mom - she's the BEST, love you Mom!). Now I won't tell you which card is for whom (because they read my weekly posts) but here's how I created each of them. Just a side note that all the envelopes were cut using the Beyond Birthdays cartridge using the "sqenvl". Each envelope was cut using the Fit to Page mode which resulted in a 7" shape. Also, all cards were cut at 5" x 10" and scored in the middle expect where noted below.

Card #1 through #3 (described starting from the top left corner of the picture) I used the same design but placed each element differently (I do this so that I remain interested in making cards all in one sitting yet still keep to the same cuts for consistency).

Card #1 - For the 'Mom' card I used Beyond Birthdays cartridge to cut out the word Mom using the Fit to Length feature set at 4". Before I nested the square bases together onto the card front, I embossed the pink cardstock using my Sizzix Big Shot machine. Next I layered a piece of patterned paper (taken from scraps left over after creating the base on my April DT Kit to be featured next week) on the right side. Then I adhered this piece onto the light green cardstock and before I placed it onto the card I tied ribbons onto both pieces. Lastly this background was placed onto the card front. I stamped the sentiment 'Just for You', cut it out in a rectangle shape before using my corner rounder punch (for dimension I placed a glue pop dot). To finish off the card, I placed the word 'Mom' on top of the embossed part of the card.

Card #2 - I wanted to use this card as a stamping project as I am still on my stamping discovery journey... I won't go into detail on how I stamped my image but here's how to assemble this card. I cut a square base at 4-3/4" so that my other paper pieces would rest upon. Next I cut my white cardstock at 4-1/4" x 3" to stamp my image and sentiment. My patterned paper was cut at 4-1/4" x 1" and both pieces were adhered onto the square base ensuring the stamped images were emphasized. To cover the seams of both pieces of paper I used ribbon to wrap around everything before adhering it onto the card front. So where did I use my Cricut... For the greeting 'Happy Mother's Day' using the Calligraphy Collection cartridge cut at 3". I used both the shadow creative feature and usual image to layer.

Card #3 - Still continuing on my stamping journey... I cut 2 square bases; one at 4-3/4" and the other at 4-1/2". First I adhered the larger square base onto the card. The smaller square I stamped an image in the top left corner then the sentiment in the middle. Next I layered a piece of patterned paper cut at 3" x 4-1/2" onto the smaller square base which covered part of my stamped image (but that's okay because it achieved the effect I wanted). I tied a piece of ribbon around these two pieces before adhering them onto the larger square base. Lastly I wrote '... on Mother's Day' on the smaller square base to fill in space on that top half and to balance out the large pattern below. So you might be asking yourself again... Where was the Cricut used? Like my last card, I used the Beyond Birthdays cartridge to cut out 'hugs to you' sentiment and glued that onto the inside of my card at 3" using the shadow blackout, shadow and usual image creative features.

Card #4 - This type of card is new for me - a gate-fold card. Still using the same dimensions as all the other cards; I scored this card at each end at 2-1/2" and folded the sides inward. Next I cut out two rectangle shapes at 2-1/4" x 4-3/4" and adhered them onto the gate folds of the cards. Next, using the floral pattern on the same scrap paper used on my gate folds as the card band base I was able to figure out how large to make the cuts. The background to the card band was cut at 4-3/4" x 4" then I trimmed the patterned cardstock to nest in the middle. To adhere the card band onto the gate fold front, I placed adhesive on the one-half of the band. Lastly, I stamped my greeting in the top right corner of the band before using a decorative corner punch. This will hopefully guide her eyes to know where to open the card. To ensure this card remain closed during the mailing process and to add another touch of prettiness, I adhered on the back a piece of ribbon ensuring it was long enough to come to the front of the card and tied a knot. And you don't need to ask again... My Cricut was used for the inside of the card, I combined cuts from the Beyond Birthdays and Calligraphy Collection cartridges using only the shadow creative feature and usual image cuts for consistency in appearance.

*Tip: Using your Cricut for your insides of the cards is perfect when you just want to say that one message like Happy Mother's Day, Love You, Miss You, etc... And when you can layer and mix up your papers it certainly gives a WOW factor that the recipient did not expect but will certainly enjoy. Try it on your next card!

*Tip: I tend to use ribbon to cover off any paper seams esp if I am not inking the edges. This can give you more detail and dimension to your project!

*Tip: I, personally find it easier to adhere in stages as supposed to an all at once approach. This makes it easier for me to ensure proper spacing and that all pieces are glued together tightly.

That's it for this week's edition of Cricut Tuesdays, thanks for dropping by! I hope I was able to inspire you to re-use and re-cycle your scraps into making wonderful projects like these one featured in this post.

Until next Tuesday... Take Care!

Sunday, April 19, 2009

Sweet Butterflies, And Shimmery Petals ~ Jackie's Creations

I love when you see a great sketch, and it instantly sparks an idea for a layout!

Do you want access to amazing sketches and challenges??? If so you have to head over to the Posh Designs Interactive Community!

Today I am sharing a layout that is my interpretation of Posh Designs Sketch Challenge #7! It is a layout of our dog Lily! She is such a sweetie!

The gorgeous chipboard butterfly is from Scenic Route. And the shimmery flowers are from Imaginisce - Rainbow bloom in purple!

And the So Sweet sticker is from Cosmo Cricket - Girls Galore! I hope you enjoyed my project today, until next time happy scrapping!

Friday, April 17, 2009

Fresh Fridays - Challenge your brain...

Springtime is here and isn't it lovely. Usually this is when we start doing spring cleaning, to clear away the clutter and dust of winter. We open up the windows to let in the fresh air and sweep away the cold, dark blues of winter.

Well, if we're all so willing to do that for our homes, why not ourselves?

We get so used to a certain way of doing things. Habits and routines that sew themselves into the fabric of our lives. It's springtime folks, let's put on our thinking caps and challenge ourselves.

Over at the community site, we've got a fun thread in the forum for challenges. Yes, you read right a "thread", dedicated to sketch challenges and thinking outside the box. One of the fun challenges that have been posted is about Breaking the rules of scrapbooking.

Rule #3 is Scrapbook pages should always start with photos.
The challenge : Create a page about a story and photograph objects to accompany it.

How much fun could you have putting together a LO without the intial photo. My first thought was, this could be tricky. What will I do? Then it occurred to me. I have a number of favorite movies and one quote has been going through my head recently a fair amount, so why not create a page about the movie? It seems to be the trend lately, Kim posted only yesterday about her movie creations and here I am posting about mine. *lol* What a way to learn about your design team.

I wanted to keep it simple, I started by printing up the title and quote on vellum, not quite realising how tricky this can be and some of it smudged a little. Then I found a few great photos online from the movie, found a neat labyrinth to use in the background and got to work. I'm sure I could have filled the page with each characters name and quotes that I like from each of them but it would have defeated the purpose.

The main quote is the one I think of first when I think of Labyrinth, it brings me back to when I was a young teen and looked up to the character of Sarah. She was my teen heroine, braving caves, goblins and other scary creatures, not to mention the Goblin King, to save her step-brother. Her fight for family and how important it was to her and of course the new friends she made along the way made the story endearing to me and I'm sure many others. To this day it is one of a number of films that are quoted most often by my friends and I.

So I'm hoping you'll be wanting to do a little self spring cleaning and head over to the challenge thread to post about your adventures in breaking a few rules!

Thursday, April 16, 2009

Thursdays with KLDesign

Bonjour!

Comment allez vous en ce super Jeudi? Aujourd'hui je vous montre mes 2 dernières créations inspirées et j'espère, inspirante! Elles m'ont été inspirées par mes 2 films préférés et une couleur que j'adore le rouge! Je veux vous montrer comment une couleur peut donner un ton complètement différent à une page.

Pour ma première page, je voulais du rouge pour illustrer l'amour, la passion, ce sentiment que l'on ne peut pas contrôler mais qui est si doux lorsqu'on s'y abandonne. J'y ai mis du "paper lace" que j'ai peint en noir pour y donner un effet romantique et aussi car le orange du papier jurait horriblement avec le reste de ma page et j'en voulait absolument!

J'ai ajouté à la fin avec un peu de méfiance je l'avoue, un papier Maruyama à grosse maille qui est un peu brillant, je trouvais qu'il s'agençait bien avec la thématique du film qui est très imaginatif et coloré. Alors je vous présente ma page Moulin Rouge


Et maintenant ma deuxième page. Un deuxième film. Encore du rouge mais cette fois ci, qui n'a réellement rien à voir avec l'amour, on parle ici carrément; de sadisme, de cannibalisme et de vengeance, bref si rouge est la couleur de l'amour elle reste aussi la couleur du sang. Alors voici ma première page dans le style "Grunge", mais surement pas la dernière car je vous l'avoue, bien que je sois une femme très tranquille et hyper romantique et douce, j'ai littéralement trippée comme une écolière à laisser sortir mon coté "wild" pour cette page. De la peinture noire, un cardstock rouge et des crânes sont à l'honneur dans cette page en l'honneur de personnes que j'adore. (Johnny vient me rendre visite quand tu veux le café est prêt!) J'ai ajouté un peu de dentelle noire que l'on ne voit malheureusement pas beaucoup à cause du scan mais en réelle ça donne un superbe effet! Alors je vous présente ma folie, ma passion pour Sweeney Todd!

À la semaine projet pour d'autres créations!

Monday, April 13, 2009

Cricut Tuesdays with The McSmitty Girl

WOW... What an incredible week. Posh Designs Interactive Community has boomed with new memberships from all around the world! For all the Cricut users I hope this blog post finds its way into your weekly readings. I also hope to be able to show you some things you can do using your bug which is good for newbies as well as for the well seasoned scrappers and cardmakers out there! I hope I can refresh your techniques. If this is your first time reading this blog post. Welcome! Together let's share our passion for one of our most favorite tools - The Cricut.

I want to focus on some of the great sketch challenges that can be found on our Community Site. Though I won't tell you what exactly what the challenges are in detail. I wanted to show you how I used my Cricut to achieve my adaptation to each of the challenges.

The first layout is for the AAM (All About Me) Challenge created by one of our talented Design Team (DT) Members, Jackie. Here's my version of Challenge #1:


This layout was created in a 8x8 format; another challenge for me as I usually scrap using 12x12 papers and cardstocks. For all the lettering and numbers, I used the Plantin Schoolbook cartridge (found with the purchase of the Expression machine). All characters were cut at 1" using the usual set font found on the cartridge. Because there is a list of bits and pieces of information; using 1" characters was effective enough to tell my story. The story of how old I am at that moment of time. The two tags were also created from the same cartridge, cut at its usual shape image (at 2-1/2"). These tags contain more bits of info about my life and are tucked behind the picture to pull out at the reader's leisure.

The second layout was for the Breaking the Rules Challenge. This is a weekly series founded by the creator of Posh Designs Scrapbook Store and its community, Nini! Each week she will post a new sketch challenge to shake things up a bit in the scrappin' world. If you are new, have no fear. These are fun challenges to do. It will certainly make you think differently about scrapbooking. This are my pictures of Challenge #2:

For these layouts I used the Graphically Speaking cartridge. The numbers on each picture was cut at 1" using the 'word' (non-shift) creative feature. The title for this layout is called, 'Life's Little Moments' which was cut using the 'word' (shift and non-shift) creative feature. I had to layer 2 cuts because when I colored the in the negative spaces on the 1st cut; it bled. So a quick tip is that when you find that your coloring has bled into the cardtosck or paper; just cut the same image or font again then layer on top of the original cuts and volia... You have a clean image that is colored. Plus as a bonus you've added some weight onto the project!

The last layout I want to showcase this week was taken from the Posh Designs Sketch Challenge created again by Nini. This picture is from challenge #1:


For this layout I used these cartridges for the following elements. The title was created using George and Basic Shapes cartridge (usually found with the Original Personal Cricut). All letters were cut at 1-1/4" using both the Silhouette and Blackout creative features. I used 2 different colors of papers for contrast then layered them to achieve my finished item. Also the flowers were created from the same cartridge, cut at 1". I layered 2 flowers to have 1 finished embellishment hence I had to cut a total of 6 flowers. I loved how the flowers turned out. Last but not least, the side ribbon was cut using the Accent Essentials cartridge (which was with my Expression machine at the time of purchase but understand that it can be bought on its own or via using your Cricut rewards). I had used the Fit to Length cutting mode to ensure this image fit onto my 12x12 page. If you love the papers I used for this project. They are from the DCWV: Taj Mahal and La Creme stacks and can be found at Posh Designs Scrapbook Store.
I hope you enjoyed these layouts and there is so much more to see and participate in. Become a member of the Interactive Community today to join in on the fun. It is free and it is so much fun!!! Please feel free to leave me a comment or a question and better yet perhaps an idea you would like to see in an upcoming Cricut Tuesdays blog post. I'd love to hear from you!

Until next Tuesday, Take Care :)

Friday, April 10, 2009

Fresh Fridays - Hippity Hoppity

Easter's on it's way!

This week I've got a cute little project to make for your little ones (and not so little ones!). A super simple, Easter treat bag. And believe me, it's simple!

Cut a sheet of plain or printed cardstock like American Crafts Cardstock Pack - Spring to 6" X 12". Score and crease at 2 1/4", 6 1/4" and 8 1/4". Fold so that the short piece is at the front. Because it's cutting the page in half, I ended up making two at the same time! (see, simple)

To make the topper and have an extra piece for the 2nd treat bag, cut a sheet of printed paper to 6" x 5". Score and crease at 2 1/2" and 6". Attach the paper using a tape/glue runner. I've used various Easter themed adhesive borders that I had lying around to decorate the front as well as ribbon. Of course you can use anything your little heart desires to create the feel you want! I'm sure that for the Cricut users out there, you'll have the perfect cartridge to use. For the closure I used a 3/4" hook and loop circle.

Once your goodie bag is made, you'll need to fill it. Take a 6" cellophane bag and fill it with mini eggs, chocolates and marshmallow chicks, fold over the top edge and staple. Then use a tape/glue runner to attach to the inside of the goodie bag.

Now it's all ready to give. Of course after making and filling them, you may decide you want all the sweet treats for yourself!

So from all of us at Posh Designs to all of you, have yourself a Happy Easter weekend, however you may be celebrating it!

Wednesday, April 8, 2009

Thursday with KLDezign

Bonjour tout le monde!

J'espère que vous allez bien!

Repos d'une semaine pour moi après un gros dégât d'eau chez moi. Alors comme je moppais en folle, je n'ai pas pu faire ma chronique la semaine passée!

Cette semaine je vous présente une collection de papier que j'affectionne particulièrement. La marque Die Cut With A View, plus précisément la collection La Crème.

Je n'étais pas très portée à acheter cette collection qui est plutôt dans des tons que je n'utilise pas souvent. Mais je les ai swappés avec une copine et ouff que j'ai donc bien fait!

Cette collection est pleine de brillant et de faux velours! Moi qui est une fan incontestée du style Shabby Chic je n'aurais pas pu mieux tomber!

Je vous montre donc sans tarder ma réalisation avec cette collection.

Malheureusement je trouve que mon scan ne donne pas un aussi beau résultat qu'en vrai. Mais bon, on fait avec ce que l'on a!

J'ai recouvert mes chipboard avec de la peinture à craqueler Tim Holtz de couleur Antic Linen. Le mélange de satin, de craquelure et de velour donne vraiment un beau style à la page. C'est juste dommage que ça ne paraisse pas! hihi


Alors je vous donne rendez-vous la semaine prochaine pour une autre chronique, à moins que cette fois ci, ce soit mon toit qui décide de lacher.

Bisous

Kim@KlDezign

Yummy Blog Candy Giveaway!!! CLOSED

Hey everyone!

It's that time again, it's time to give back some Posh love, this yummy blog candy is to celebrate the sudden influx of new members joining our online interactive community!!! We want to thank each and every one of you for your friendship, support and patronage! THANK YOU!

Our yummy blog candy giveaway is everything pictured from We R Memory Keepers White Out line!!! All you gotta do is share this link on your blog and leave a comment! Don't have a blog, don't worry just spread the word, ok?!

Please leave your comment before 4/30 winner will be announced the next day using random.org number generator! Goodluck!!!
Many hugs & blessings from all of us at Posh Designs Scrapbook Store!


Tuesday, April 7, 2009

Cricut Tuesdays with The McSmitty Girl

Hello Everyone and hope you are having a great start to the week!
As promised in last week's post that it would be filled with techniques, tips and tricks. For a fun twist I thought I'd share a story with you. Now for anyone who knows me; I am a die hard Cricut addict! A friend of mine is a true stamping fan. So with her influence I thought 'hey I can do both'. But after investing so much into stamping and Cricut at the same time; I realized at the time that I could not master both arts. I would think of using my Cricut more than a stamp.
So I downsized my stamp stash last year. But recently and thanks to Nini and the fabulous Design Team I am proud to be a part of, I've become more comfortable with the thought of stepping outside my Cricut box. This is not say I've mastered die-cutting but I think I am at the point where I can comfortably incorporate other techniques like stamping into my Cricut creations. This week we will explore my baby steps into the stamping world while using my Cricut. So I like to tell you a story about it. It is called 'The Cricut and The Stamp'.

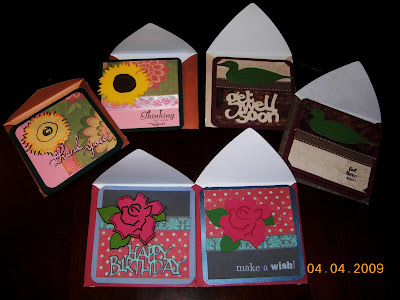
One day The McSmitty Girl remembered she needed to make a birthday card for her MIL's birthday. So off she went to her scrap space and started to research her options. The McSmitty Girl realized she required more than 1 cartridge to accomplish this card as she required the card itself, the coordinating envelope, the phrase and the image to go with the phrase. Then The McSmitty Girl remembered that the Cricut Juke Box holds up to 6 cartridges. No more swapping of the carts! So the Juke Box got plugged into the Expression machine via its connective wire and in went the following cartridges into the Juke Box: Celebrations, Beyond Birthdays and 50 States from the Classmates Series.

Using a mix of 12x12 paper and cardstock & scraps, first the envelope was created using the Celebrations cartridge. On this cartridge it is foundation key 'sqenvl' (using the shift key) which was cut out at using the 'Fit to Page' feature.

Next was the card cut using the same foundation key 'sqcard' (using the non-shift key) done to ensure a proper fit. The layered square part of the card was assembled using scrap paper and ribbon. The phrase 'Happy Birthday' was cut at 2" using the Beyond Birthdays cartridge (creative features used were shadow and usual phrase cuts) then nested and glued together. Finally to pick a flower image to coordinate this card.

From the 50 States cartridge the McSmitty Girl chose the 'NY' flower (creative feature) which is the Rose. But to add oomph she thought why not use a Cricut Marker to outline then make the cut. First the base was created using the 'NY' flower creative feature then she proceeded to cut the layer piece using the 'NY-s' flower creative feature all at 3". Next for additional pop, the McSmitty Girl cut the same 'NY-s' flower creative feature at 2-3/4".

All the pieces were layered and glued together before it was adhered to the card with adhesive dimensional dots. Looking at the finished product, the McSmitty Girl thought this was just too beautiful of card and decided to make more cards creating a set as a gift for her MIL.

Then one day the McSmitty Girl and her son became very sick. When recovering the McSmitty Girl remembered that she had 1 week left to complete her MIL's birthday gift. So this time she paid a visit to Stamping World. During her stay, the McSmitty Girl thought she could make the 'same' card but with no markers and stamped greetings for a different look. As a result and 1 afternoon later, three cards were created and complete. The McSmitty Girl chose only greeting type stamps as she thought this was the simplest way to get back into stamping.

The morale of the story is that stamping can enhance a Cricut project and help you out when you are in a bind for time. And that using the Cricut accessories can help you save time and energy all the while giving more pop to your projects and maximize your Cricut creativity. But for the McSmitty Girl the Cricut will always have a place in her scrappin' - craftin' heart. It will be her go-to tool and technique of choice as she incorporates more of other elements into her work.

The following cards all used the same cartridges, creative features and size of cuts with and without the markers. For the 'thank-you' card the Sunflower image was the 'KS' and 'KS-s' flower creative features from the 50 States cartridge. And the Common Loon made for the 'get well soon' card was the 'MN' and MN-s' bird creative features from the 50 States cartridge.

*The 's' beside the state abbreviation means the shift key was used to make the layered cut to its corresponding base.

Here are some my tips and tricks to help you re-create these cards or make your own creations. I wish someone told me some of these... Some of these tips and tricks were discovered simply through trial and error on my part.

Tip and Trick #1:
When using the Juke Box ensure your overlay is placed on the keyboard of the highlighted cartridge. When you press onto that corresponding button to activate that cartridge, the machine will initally read 'cartridge not found' but seconds later it will read the cartridge you've chosen.

Tip and Trick #2:
Place your Juke Box beside your machine when attached to your Cricut machine. Not in front or at the back as this will interfere with the cutting process.

Tip and Trick #3:
The connective cords actually fit into a specific fashion. Do not try to ram in the port connectors into the Cricut machine or into the Juke Box. It will not fit and you will risk ruining both machines and the cords themselves.

Tip and Trick #4:
Using the Cricut Markers will not work with the Portriat cutting mode.

Tip and Trick #5:
To effectively use the Cricut Markers and cut out the drawn images, your paper must be in the top left corner of the mat that enters the machine.

Technique Tip #1: Using the Cricut Marker
a) Remove your blade assembly and replace with marker color of choice. For these cards I used either black or brown.
b) Load paper as usual.
c) Choose image as usual.
d) Press cut which in this case will actually draw out your image.
e) Press Load Paper when cutting (i.e. drawing) is completed.
f) Replace Cricut Marker with blade assembly.
g) Hit Repeat Last. Now the Cricut will cut out around the drawn lines your image.
h) Press Unload Paper as usual to remove your drawn, cut image.
i) Repeat steps 'a' through 'i' for additional layers.

I eventually made my MIL actual birthday card. Want to see it and more my Cricut creations that are not featured in my weekly blog posts? Become a member of the Posh Designs Interactive Community. It's FREE and there is no obligation. Hope to see you there! I look forward to welcoming you all!
Hope you enjoyed this week's post! I love comments and if there is something you would like to see either a specific cartridge used (I have them all!) a project or even certain materials; please drop me a line either in the feedback section below or via the Interactive Community Site. Thanks!
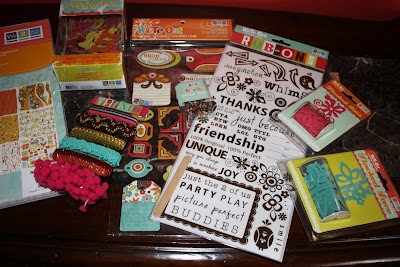
Wanna win some free scrapping supplies!?

Who doesn't love FREE scrapbooking supplies visit the community site for details on how you could win 40$ worth of goodies absolutely gratuitos! Ladies did I mention that's it's double trouble month not only could you end up with 40$ worth of supplies but by entering this month's Spring Fever contest you may be on your way to winning an additional 25$ worth of supplies and best of all you get to pick your prize for our monthly contest! Goodluck & Happy Scrapping!

Contest is open to Canadian & US Residents only!

Monday, April 6, 2009

K and Company's New Madeline Collection

Just in is K and Company's brand new collection called Madeline! The color schemes on this line is just gorgeous! If you're a fan of fun florals and whimsical butterflies then you'll be sure to put these beautiful assortment of products to good use! From double sided speciality paper to wax seals this line is sure to please!

In stock items:


Sunday, April 5, 2009

My Little Yellow Bicycle ~ Sharon Ann's Baby Safari Collection

Sharon Ann has created a sweet baby line just for you! This playful menagerie of jungle animals offers just the right amount of cuteness and charm. Adorably simple in style and built around the perfect palette for baby girls, this irresistible collection is sure to delight. Baby Safari includes everything from fuzzy felt ribbon to Flanimals animal stickers fashioned from flannel, cardstock papers and embellishments.

Baby Safari for Girls features a delightful array of goodies with a sweet dusting of glitter throughout. Another sophisticated assortment of beautiful baby products!

Sharon Ann has created another sweet baby line just for you! Adorably simple in style and built around the perfect palette for baby boys, this irresistible collection is sure to delight. Baby Safari for Boys features beautiful embossing and thermography throughout. Simply irresistible.

Be sure to check out the store for all the coordinating items in this collection, the clear stamps are just too cute!

Friday, April 3, 2009

New Sassafras Lass Collection Kits ~ Vintage Yummy, Bungle Jungle, & Anthem!


When these babies arrived I was like OMG I gotta have one set of each for myself! Currently we have their 3 new collection packs which has enough goodies in them to make dozens of projects! These kits retail for 24.99$ CDN and are on special for only 19.99$ CND which is about 16$ USD it's a steal deal!
Like I've mentioned before US buyers take advantage of our low loonie you'll save bundles by purchading your supplies from Canada :)

We've got the Vintage Yummy, Bungle Jungle and Anthem Collection Kits we're also expecting a shipment of their new clear stamps, felties, brads and more goodies!!!

Pink Paislee Winsome Line ~ Captivating, Enchanting, Fascinating and Fetching Collections


Hey everyone! Just in are some yummy embellies from Pink Paislee's new collection called Winsome! I'm a little late on the new releases in store but I'm getting there lol!

We've got embellies from their Captivating, Enchanting, Fascinating and Fetching collections!

They have released these oh so cute Fabric Flowers they come in two's and are adorned with an adorable stitched button center! They are lightweight canvas fabric flowers that are tea dyed and wrinkled to create that perfect shabby chic vintage look!

We've got the most adorable chipboard boxes, they are Pink Paislee's new Chipboard Elements! These are pre-printed chipboard shapes that coordinate perfectly with all of the Winsome collections!

Also in are the most cutest brads I have ever set my eyes on, each pack includes 3 corduroy brad, 3 velvet brads, 3 gemstone brads, and 3 printed epoxy brads!

Last but not least super new and extremely cute Winsome Press Ons from Pink Paislee! So be sure to check out the What's Posh section in the store!

Fresh Fridays - April showers...

Bring May flowers.

It's officially been spring for two weeks now, but today really feels like a spring day. Mild and rainy, washing away the snow and winter grime and making things ready for spring. It's grey out and I do realise it will be that way for a few days at least, but I also know that the grunge is going away.

When the sun shines, it's brighter and warmer. The month of March was the start of spring cleaning for me. I tidied up each room and started to do a spring purge. This month I'll look at the fun, fresh products we have in store for the perfect spring layout!


First off, have you seen some of the new goodies? BoBunny rub ons Twirls (to the left) How adorable! or what about Michelle? I'd say they are very spring like *and* only $3.99 each!

There's many more sweet items in the New Items section if you just take a look.

American Crafts cardstock pack, is back in stock. If you haven't tried these, you really should. The colours are amazing, the quality of the paper if phenomenal and at only $19.99 for 6o sheets you can't get a better deal.

Put these few items together with your fresh spring photos and you'll have the prettiest layouts around. Head on over to the community site to check out some fun challenges that will jump start the creative juices. Can't wait to see you there!

Thursday, April 2, 2009

Layout using Que Sera Sera Collection

Hi everyone!
Today I'd like to share with you a project I created over the weekend using gorgeous speciality papers from the new Que Sera Sera line by K and Company. I was inspired by one of the many fun challenges over at the community site and I encourage those who have not yet become a member to sign up and join the fun! We've got many talented ladies out there who will be sure to get your creative juices flowing!

In this layout I decided to create something based one of my non scrappy addiction, I'm insanely obsessed with all things makeup! My all time favorite place to shop is at Sephora's, my hubby has banned me from buying online so I content myself by building up my wishlist for the next special occasion which so happens to be Mother's Day hihihi...

Here's a look at my layout which is loaded with bling I just love glittery and shiny things!
Since I'm a glam and chic city mama it only felt natural to use some awesome rub-ons from Glitz Designs new Hot Mama line! The four 2x2 pictures of those sassy dolls and their caption bubbles are taken from Benefit Cosmetics site, they sell amazing shimmery eye shadows, blush, bronzers in cute eco friendly boxes and cases which you can then alter them into fun gift boxes!


In my culture, eyes are the most sacred part of the human body, which is why since birth all indian mother apply kajal/kohl to their babies eyes. By doing so, the action itself over time gives the child beautiful and big almond shaped eyes! In my layout after I glued on the large picture of the eye I remembered that in indian marriages we embellish the bride's eyes with various gems! So I cut off a Prima Say It in Crystals and slowly adhered it onto the contour of the top eye line and bottom corner eye.

I really enjoyed playing with this new line because the color combinations are amazing! I created my own paper flowers using 2 different sizes of EK Success Paper Punches. I added a couple of Que Sera Sera Charmers and Making Memories Flower Patch Gems for the center of my flowers.


I created some freehand flourishes using Ranger Ink Liquid Pearl to various parts of the page. I then used just a few of Que Sera Sera Grand Adhesions, Adhesive Chipboards, and Diecut Ephemera and voila a finished project, well almost done I still need a title which in my case "OBSESSION" speaks for itself!

Happy Scrapping!


Blog Design By Sour Apple Studio © All Rights Reserved.