Nos membres - Our peeps

Showing posts with label Amy Bender. Show all posts

Monday, January 3, 2011

Alter It Monday - Blooming hearts!

An English version will follow.

Voulez vous créer une fleur qui capte l'attention et qui est très facile à fabriquer?
Oui? Super!

Nous allons avoir besoin d'une colle à prise rapide, un brad, un cercle et un tas de petits cœurs poinçonnés. (les miens ont environ 2cm et j'ai utilisé la collection Cosmo Cricket Pixie-Licious)

Would you like to create a flower that is attention grabbing and super easy?
Yes? Great!
We'll need some quick drying liquid adhesive like Zip Dry, a covered brad, a rough cut circle, and a bunch of punched out hearts (Mine are about 2cm in size and I used the Pixie-licious paper by Cosmo Cricket that is at the shop.)


Couvrez le rebord du cercle avec de la colle et collez vos petits coeurs.

Run a bead of glue around the edge of the rough cut circle.
Lay the hearts on the glue and over lap them slightly.


Répetez le cercle de cœurs en allant vers le centre de la fleur.

Repeat the circles of hearts while working yourself down to the center of the flower.


Ajoutez le brad (brad recouvert avec le système I-Top)
et voilà c'est fini!

Add the covered brad to the center of the flower and there you have it!


Amusez vous et bonne semaine!
Enjoy and have a great week!

Monday, December 13, 2010

Alter It Monday ~ Bodice Laced Mini-Album - Completed!

An English version will follow.

Bonjour à tous!

Je pense que je vais vous montrer ce qu'est devenu l'album que j'ai commencé la semaine passé dans la chronique: mini-album corset. Ça m'a pris un moment pour savoir ce que je voulais en faire mais finalement ça m'a frappé...

ÇA

Hi All!

I thought that I would show you what became of last week's Bodice Laced Mini-Album. It took me a moment to figure out what I wanted to create with it, but then it hit me...

THIS!

Un album Joie! (joy) J'ai utilisé une tonne de produits Prima du magasin et une fleur Sandylion. J'ai planifié d'y mettre les moments de joies que j'ai pris au hasard dans ma vie.

Merci d'avoir regardé et j'espère que vous aurez une semaine créative!

A Joy Album! I used a bunch of Prima goodies from the store and a Sandylion flower as well. I plan to record the moments of Joy that randomly happen in life.

Thanks for looking and I hope you have a creative week!


~Amy

Monday, November 29, 2010

Alter it Monday ~ How To Do Bodice Lacing on a Mini Album

The English version will follow.

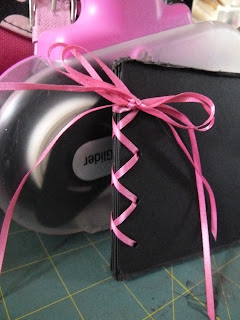
C'est vraiment simple de créer un mini-album avec un look de corsage lacé. J'ai utilisé, des couvertures en chipboard, (les miens étaient 4"x4"), le Distrezz-It-All, le Crop-A-Dile, un ruban étroit et une aiguille à broderie.

Pour commencer j'ai passé trois bords des couvertures sur la Distrezz-It-All. J'aime beaucoup l'effet du très usé mêlé à celui du corset lacé.

It's very easy to create the look of bodice lacing on a mini-album. The tools that I used to create with are chipboard panels (mine are 4"x4"), the Distrezz-It-All, Crop-a-dile, skinny ribbon, and an embroidery needle.

To begin, I ran three of the edges of the chipboard panels through the Distrezz-It-All. I like the highly distressed edge against the refined look of the bodice lacing.


Ensuite j'ai troué 4 trous, espacés également au long du coté qui n'était pas travaillé sur les panneaux.

Next I punched 4 holes, equally spaced, along the non-distressed edge of the chipboard panels.


Maintenant enfilez le ruban sur l'aiguille.

Now thread the skinny ribbon on to the embroidery needle.


Tenez les 2 panneaux ensembles et lacez au travers des trous de la même façon que vous feriez pour vos chaussures.

Take the panels, stack them together, and lace through the holes like you are lacing up shoes.


Lorsque vous serez en haut, retournez vers le bas et finissez du coté opposé que vous avez commencé.

When you have gone upwards with the lacing, go downward and finish off on the opposite side of where you started.


Attachez avec une bouche solide et faites en une deuxième par dessus!

Tie the ends in a bow and then tie another bow on top of that one!


Profitez de votre mini-album!

Enjoy your mini!


Amy

Monday, November 8, 2010

Alter It Monday ~ Tic-Tac-Toe Magnets!

Bienvenue au Lundi altéré. Aujourd'hui nous allons créer un amusant petit kit de Tic-Tac-Toe magnétique.

Pour débuter, réunissez ensemble une feuille du kit Pixie-licious de Cosmo Cricket, un cardstock de couleur rose, un bâton de colle, une machine à découpe comme la Slice et enfin 12 cadres en acrylique magnétique de format 2"x 2".


Welcome to Alter It Monday! Today we are going to create a fun set of magnets to play Tic-Tac-Toe with.

To start, let's gather together a sheet of Cosmo Cricket Pixie-Licious in "Flower Fields", some shimmery Pink matching Card Stock, a Glue Stick, a die-cut machine like the Slice, and 12 2"x2" (5cmx5cm) magnet acrylic frames.


Pour commencer, coupez 2 bandes dans le papier de 2" par 12" de long. Ensuite coupez chaque bande pour avoir 6 petits carrés. Ils ont tous la même mesure soit 2"x 2". Nous allons travailler sur le dessus de 6 et le dessous des 6 autres.


To start, Cut two strips from the Cosmo Cricket that are 2 inches (5cm) wide by the full 12 inches (30cm) of the paper.
After you have created strips, cut each strip into 6 squares. They will equal 2"x2" (5cm x 5cm). We will work on the fronts of 6 and the backs of 6.


Ensuite, prenez votre Slice et coupez 2 formes, 6 fois chacune. J'ai utilisé des papillons et des libellules. Ils ont été coupés pour mesurer 1 1/2".

Next, take the Slice and cut 2 sets of 6 shapes each. I used Butterflies and Dragonflies. They were cut at 1 1/2" size.


Collez les libellules sur les carrés ayant le même motif et les papillons sur les carrés restant.

Glue the Dragonflies to one set of the cut squares and the butterflies to the other.


Glissez les carrés à l'intérieur du cadre magnétique. C'est maintenant l'heure de jouer au Tic-Tac-Toe! Nous les gardons sur le réfrigérateur. Les enfants ont beaucoup de plaisir à jouer ensemble!

Slide the squares into the frames. Now it is time to play Tic-Tac-Toe! We are keeping our set on the refrigerator. They kids have been having fun playing against each other.


Passez une merveilleuse journée!

Have a wonderful day!
~Amy

Monday, August 2, 2010

Alter It Monday ~ Coffee Filter Cosmos!


Hello and Happy Monday!
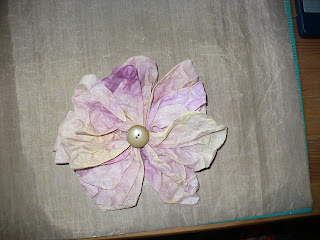
Today we are going to create Cosmos flowers with coffee filters and Glimmer Mist!  
The needed supplies are:
~coffee filters, 5
~A number of Glimmer Mists, I used 5!
~Staples and stapler
~Coordinating chalk ink
~Button
~liquid adhesive
Start off by misting the coffee filters.  Layer the colors as you see fit and make them all pretty. 
When you have the desired colors on the filters, set them aside to dry.  After a few minutes, wad them all up in your hand and crumple them into a ball.  Set that aside to dry.  Once dry, smooth them out into their circles again.
Fold each circle in half.  Fold rounded edge down to the first fold line.  Repeat on other side.
Fold this in half again and pinch/hold for stapling.
 
Alternate and overlap stapled ends.  Staple in place.
 
Fluff out the petals of the flower to desired fullness.
Take the Chalk Ink and swipe on the center of the flower.  Glue Button in place with Liquid adhesive.
Enjoy your flower!
Have a wonderful day!
~Amy

Monday, July 5, 2010

Alter It Monday ~ Raffia Flowers


Hey everyone,
I got a quick and fun flower tutorial that can be done in just 4 easy peasy steps!

1- Cut (5) 12" lengths of raffia.
2- Tie each length into a bow.
3- Glue each bow along the outside edge of a chipboard circle.
4- Embellish center as desired.  I used a wooden brad to continue the natural feel of the flower.

Enjoy! ~ Amy

Monday, June 7, 2010

Alter It Monday ~ Flutter on by my Butterfly!

Flutter on by...my Butterfly!

Summer is upon us and the butterflies are flitting about.  This is such a wonderful sight to behold!  Could you imagine being carried about in the breeze on whisper light wings?  Oh to be a butterfly!

I thought about that today and gathered together a few of my favorite supplies.  I had to create a Butterfly!

I used some pattern papers, adhesives (wet and dry), and a piece of raffia.

I cut one piece of pattern paper in an elongated trapezoid shape. 
 

I folded the wide end of the trapezoid up and over the raffia that I folded in half.  This was then glued in place.
 

Roll the pattern paper all the way to the end and glue in place.  This creates the Butterfly's body!
 

Fold another piece of pattern paper in half and adhere it firmly in place on all sides.
 
Get out those trusty old decorative scissors and freehand cut some wings. 

Pinch and fold the bottom wing and glue in place.  Alternatively, a staple will do nicely as well.  Repeat this for the top set of wings.

Adhere the body to the wings and there you go!

Monday, May 17, 2010

Alter It Monday ~ Ribbon and Button Wreath

This sun inspired ribbon wreath is a quick and easy project to do.

You will need a bunch of ribbons, buttons, a sheet of chipboard, a stapler, and some fast drying liquid glue.

I cut my chipboard into a giant "O" that was about 3/4" thick.
My ribbons were roughly 5 to 6 inches long.

To assemble, I stapled the ribbons around the circle as if they were awareness ribbons.
Once I filled up my ring, I glued the buttons over the staples.
I added a length of ribbon at the top for hanging.

There you go!

This wreath can be made with all sorts of ribbons, scrap ribbons, etc. A variety of textures would be fun!

Have a wonderful week,
~Amy

Monday, May 3, 2010

Alter It Monday ~ Great Glittery Borders!

Have you ever wanted to glitter a border that you punched out? Did you try applying glue to it, glittering it, and then just been unhappy with the result? Well have no fear! A few easy steps are here!

A great way to glitter a border is to start with something solid and sticky. I found that using mailing labels are great! So let's gather up three basics...glitter, a border bunch, and mailing labels.
Punch your mailing labels with the backer liner still in place. Make as many as you need.

Sprinkle out that pretty glitter.

Peel the backer liner off the label carefully and stick it on a finger. Pat the label firmly into the glitter. Tap off the excess.

There you have it! A sparkling, glittering punched border!

Have a wonderful week!
~Amy Bender
 

Blog Design By Sour Apple Studio © All Rights Reserved.