


Well Summer has finally arrived and you know what that means... Long Weekends, Spending Time Outdoors, Enjoying Warm Weather, and hopefully Spending More Time with Family and Friends (i.e. BBQs, Parties, Weddings).
So this week I would like to show you some paper crafts you can create with your Cricut using the Life's a Beach cartridge.
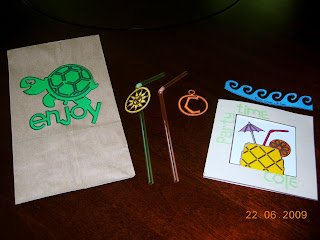
Invitation (finished size: 5" square card):
- Trim cardstock to 6x12".
- Set size dial to 5".
- Insert Cricut Marker color of choice.
- Press 'Square Card' creative feature, then the 'PineapDrnk' shape (with the letter 'P') and press Cut.
- Once image has been drawn, press Load Paper, switch out the marker for your blade assembly, press Repeat Last (card image will now be cut within the marker drawn lines)
- Unload paper, score in half.
- Color in parts of card as desired.
- For the words 'party time cole' (as my example), set size dial to 0.75" - pressure: low - pressure and blade accordingly to paper weight (see Cricut Lounge for more info on paper weights in relationship to cutting with your Cricut); then press 'shift lock' and key in each letter to create your phrase.
- Adhere letters to card as desired.
- Trim cardstock to 3-1/2" square to adhere to the inside of the card or the shape will show through the card itself.
Tip: Unfortunately this cartridge does not have layering parts for the square card creative feature. So use light colored paper so that coloring can be quick and use different colors for a more dimensional effect.
Food Labels:
- Trim cardstock strips to 6 x 1.5".
- Load in Cricut Marker.
- Press Border creative feature then your image of choice (for my example I chose the wave).
- Set size dial to 1-1/4", press Cut.
- Once image is drawn, press Load Paper.
- Switch out marker for the blade assembly, press Repeat Last then Cut.
- Write in the food dish name, adhere a toothpick in the centre (believe it or not I had none when creating these projects) and place on top of food.
Straw Charmers (like wine charmers):
- Trim cardstock pieces to 3" square.
- Press Charm creative feature.
- Set size dial to 2", choose image then load in a Cricut Marker.
- Press Cut.
- Once image is drawn, press Load Paper
- Switch out marker for blade assembly, press Repeat Last.
- Insert charm to straw from the bottom and adhere with tape on back
- The 2" size is perfect for your standard straws you find in most stores. For jumbo straws, try 2-1/2" or larger depending on your straws.
- For the letters, press the Shift key - for images, they are set to the non-Shift key.
Favor Bags:
- Trim cardstock to 5 x 5".
- Press TitleWords creative feature.
- Set size dial to 4", choose image (for my example I chose the turtle which already came with the word 'enjoy'), then load in a Cricut Marker.
- Press Cut.
- Once image is drawn, press Load Paper.
- Switch out marker for blade assembly, press Repeat Last.
- Adhere image onto paper bags or favor bags of choice.
Tip: You can load in your Cricut Marker anytime before you press Cut. If by chance you actually make a cut first; no worries... Once your image is cut, press Load Paper, switch out the blade assembly for the Cricut Marker, press Repeat Last then Cut. Just don't forget to switch out the marker for the blade assembly ready for your next project!
These are so super easy to do and can add great themed effects for your Summer Party! Have fun. Until next week... Happy Crafting!


0 comments:
Post a Comment