


In honour of Earth Day (April 22nd) the following cards were created using scraps from my ever growing stash as well as re-using left over packaging from empty cereal and snack boxes.
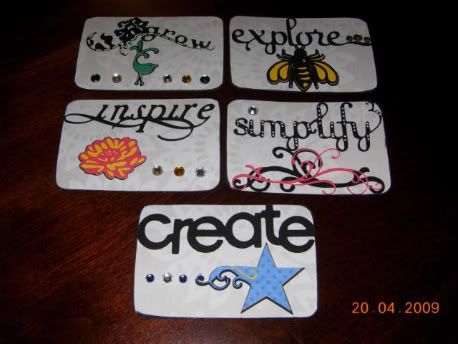
The first project I created is a series of ATCs (Artist Trading Card) out of empty cereal and snack boxes. I purposely created 5 different cards but using the same background paper and main color of cardstock for consistency. The reason I called my ATCs a series is because I knew that making the same card over and over would result in mistakes and shortcuts as a result not all the cards would look the same.
To create these cards I had them cut in the 'rectangle-2' shape at 4" each using my George cartridge. Because of the thickness of the cardboard, I used the multi-cut feature set on to cut 2 times. Following with the patterned paper (taken from my scrap folders, another re-use of product) I cut the same shape as the cardboard to cover both sides. The card edges were then inked all around for a finished look (and to cover the cardboard thickness).
For each of the words I chose, I used both the Home Decor and Home Accents cartridges. All the words were cut using the Fit to Length feature to ensure its length was no longer than 4". As a result each image was cut at approx. 1-1/4" (again love how the Cricut figures that out for you). Then each of corresponding images were taken from the Home Decor cartridge all cut between 1 to 1-1/2". Depending on the image I used a base for all my images; the shadow blackout creative feature. I combined creative features to adhere onto my base using either the standard cut image and/or all 3 three which included the shadow creative feature for additional pop on the ATC.
*Note though that these cartridges are Solution based cartridges which basically means that the creative features are less than your standard cartridge and you may not have as many image options to layer or cut. BUT these Solution cartridges give you many creative possibilities to use them on your projects.
Once I nested the images together, they were adhered to the ATC in a spot not to interfere with the card's word. Lastly, I embellished with rhinestones for bling and used a gel pens on a couple for added detail. These were certainly fun to make and it makes great use of my scraps!
 The next project is my series of Mother's Day Cards. Still wanting to re-use alot of my scrap patterned papers and cardstock, I made 4 cards to honour the moms in my life - my Mom, my MIL, my Step MIL and my BF all are whom great moms (but of course more biased towards my Mom - she's the BEST, love you Mom!). Now I won't tell you which card is for whom (because they read my weekly posts) but here's how I created each of them. Just a side note that all the envelopes were cut using the Beyond Birthdays cartridge using the "sqenvl". Each envelope was cut using the Fit to Page mode which resulted in a 7" shape. Also, all cards were cut at 5" x 10" and scored in the middle expect where noted below.
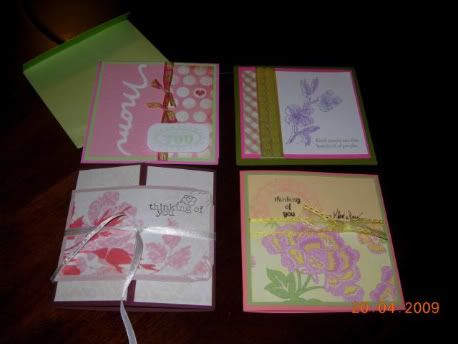 Card #1 through #3 (described starting from the top left corner of the picture) I used the same design but placed each element differently (I do this so that I remain interested in making cards all in one sitting yet still keep to the same cuts for consistency).
Card #1 - For the 'Mom' card I used Beyond Birthdays cartridge to cut out the word Mom using the Fit to Length feature set at 4". Before I nested the square bases together onto the card front, I embossed the pink cardstock using my Sizzix Big Shot machine. Next I layered a piece of patterned paper (taken from scraps left over after creating the base on my April DT Kit to be featured next week) on the right side. Then I adhered this piece onto the light green cardstock and before I placed it onto the card I tied ribbons onto both pieces. Lastly this background was placed onto the card front. I stamped the sentiment 'Just for You', cut it out in a rectangle shape before using my corner rounder punch (for dimension I placed a glue pop dot). To finish off the card, I placed the word 'Mom' on top of the embossed part of the card.
Card #2 - I wanted to use this card as a stamping project as I am still on my stamping discovery journey... I won't go into detail on how I stamped my image but here's how to assemble this card. I cut a square base at 4-3/4" so that my other paper pieces would rest upon. Next I cut my white cardstock at 4-1/4" x 3" to stamp my image and sentiment. My patterned paper was cut at 4-1/4" x 1" and both pieces were adhered onto the square base ensuring the stamped images were emphasized. To cover the seams of both pieces of paper I used ribbon to wrap around everything before adhering it onto the card front. So where did I use my Cricut... For the greeting 'Happy Mother's Day' using the Calligraphy Collection cartridge cut at 3". I used both the shadow creative feature and usual image to layer.
Card #3 - Still continuing on my stamping journey... I cut 2 square bases; one at 4-3/4" and the other at 4-1/2". First I adhered the larger square base onto the card. The smaller square I stamped an image in the top left corner then the sentiment in the middle. Next I layered a piece of patterned paper cut at 3" x 4-1/2" onto the smaller square base which covered part of my stamped image (but that's okay because it achieved the effect I wanted). I tied a piece of ribbon around these two pieces before adhering them onto the larger square base. Lastly I wrote '... on Mother's Day' on the smaller square base to fill in space on that top half and to balance out the large pattern below. So you might be asking yourself again... Where was the Cricut used? Like my last card, I used the Beyond Birthdays cartridge to cut out 'hugs to you' sentiment and glued that onto the inside of my card at 3" using the shadow blackout, shadow and usual image creative features.
Card #4 - This type of card is new for me - a gate-fold card. Still using the same dimensions as all the other cards; I scored this card at each end at 2-1/2" and folded the sides inward. Next I cut out two rectangle shapes at 2-1/4" x 4-3/4" and adhered them onto the gate folds of the cards. Next, using the floral pattern on the same scrap paper used on my gate folds as the card band base I was able to figure out how large to make the cuts. The background to the card band was cut at 4-3/4" x 4" then I trimmed the patterned cardstock to nest in the middle. To adhere the card band onto the gate fold front, I placed adhesive on the one-half of the band. Lastly, I stamped my greeting in the top right corner of the band before using a decorative corner punch. This will hopefully guide her eyes to know where to open the card. To ensure this card remain closed during the mailing process and to add another touch of prettiness, I adhered on the back a piece of ribbon ensuring it was long enough to come to the front of the card and tied a knot. And you don't need to ask again... My Cricut was used for the inside of the card, I combined cuts from the Beyond Birthdays and Calligraphy Collection cartridges using only the shadow creative feature and usual image cuts for consistency in appearance.
*Tip: Using your Cricut for your insides of the cards is perfect when you just want to say that one message like Happy Mother's Day, Love You, Miss You, etc... And when you can layer and mix up your papers it certainly gives a WOW factor that the recipient did not expect but will certainly enjoy. Try it on your next card!
*Tip: I tend to use ribbon to cover off any paper seams esp if I am not inking the edges. This can give you more detail and dimension to your project!
*Tip: I, personally find it easier to adhere in stages as supposed to an all at once approach. This makes it easier for me to ensure proper spacing and that all pieces are glued together tightly.
That's it for this week's edition of Cricut Tuesdays, thanks for dropping by! I hope I was able to inspire you to re-use and re-cycle your scraps into making wonderful projects like these one featured in this post.
Until next Tuesday... Take Care!


Gorgeous creations as always!
ReplyDeleteLove the ATCs great first try!