Happy Holidays Everyone and I hope you are having a great start to the week!
Can you believe we are only 10 days away from Christmas Day? Unbelievable eh? And if you are like me there are many last minute preparations you need to find some crafting time to do. Also if you still have tons of Christmas papers, cardstock and/or themed embellishments to use up, this is another great opportunity for you to clear through your stash! Between us girls, it’s all about clearing through your stash so you can justify buying the newest, freshest stuff found right here at the Posh Designs Scrapbook Store, right? J
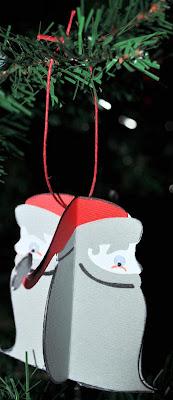
This week I will show you how to create quick, simple and adorable Christmas ornaments. You can use these ornaments as part of your gift giving trim, a gift tag for that present, home décor, and so much more…
What you will need for this project:
- Christmas themed papers
- Cardstock in your choice of color(s) – Try using metallic, pearlized or glittered cardstock.
- Holiday themed embellishments – You can also use ‘everyday’ embellishments such as solid colored brads, rhinestones brads, buttons; it is totally up to you!
- Heavy-Duty Hole Punch (like the WRMK Crop-a-Dile) - 1 punch per ornament required. The purpose of this tool is to thread cord/ribbon through to hang your ornament onto your present, tree or within your home.
- Any Cricut cartridge you have on hand containing Christmas themed images such as Joys of the Season, Christmas Cheer, and the Solutions cartridge Christmas Noel, Snow Friends and/or When It Is Cold Outside.
- Ink Pads or Paint Dabbers (optional) – These tools are used along the edges to give a finished look to your ornament.
- Ribbon, Cord or Thread – To string your ornament and hang onto your present, tree or within your home.
Here are the instructions to create your ornament:
- Set your size dial to at least 3-1/2” or taller.
- Ensure your pressure and depth adjustments are appropriate to your paper/cardstock of choice. *Tip: You will be able to fit 4 cuts onto 1 – 12 x 12 piece of paper/cardstock as long as your size of your cut is less than 4”.
- Press your QUANTITY button ON and set to ‘2’.
- Select your image and Press CUT.
- Once it has completed the 1st two cuts; Press the FLIP button ON.
- Press the REPEAT LAST button and this will automatically bring up the last image cut. Then press CUT. Do not adjust any of the dials.
- If your image has layers, cut them out without adjusting the size dial.
- Nest and adhere all layered pieces onto each die-cut (if applicable).
- Take each cut and score each of them in the middle lengthwise. Ensure all score lines are equal per die-cut.
- Handling the 1st die cut (non-flipped), take the one folded side and match up to the 1st FLIP die cut. Adhere both ends together. You will notice that the cuts will align together seamlessly indicating to you that you have the correct sides matched up.
- Take the side of 1st flipped die-cut and adhere the side onto the 2nd non-flipped die-cut.
- Take the 2nd non-flipped die-cut and attach together the sides of the 2nd flipped die-cut.
- Re-fold each score line for crispness.
- Ink or Paint the edges of the ornament (optional)
- Punch a 1/8” hole at the top of the ornament and string through cord or ribbon of your choice.
- Embellish as desired.
Have fun creating your ornaments! And until next Tuesday, Happy Crafting!
~Michelle J


Love this Michelle!!! Super cute!!!
ReplyDelete