 Hi Everyone and Happy Tuesday!
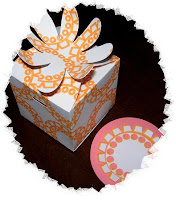
Summer is in full swing here in Canada! Warm weather, clear skies and the bright sun were the inspiration for this week's post. Another short and simple project you can use for your upcoming BBQs, parties and get-togethers ~ a box and coordinating tag. You can use the box as part of your celebratory decor by filling it up with treats for your guests to nibble on or you can use these boxes to give as a parting thank-you gift. The possibilities are endless and I hope this edition of Cricut Tuesdays sparks your creativity. This week I will be using 2 cartridges: Tags, Bags, Boxes and More in addition to Accent Essentials plus the Cricut Markers. So let's go...
To create the box:
- Place a 12x12 solid piece of cardstock onto your cutting mat (preferably a light color)
- Remove the blade assembly and replace with a marker color of choice
- Insert the Accent Essentials cartridge first
- Load paper as usual
- Press the 'Auto Fill' button ON
*Trick: This feature will cut or draw automatically the maximum amount of images onto your cardstock/paper.
- Choose your image (for this project I used 'Accent-4')
- Select your size (I chose to size my images at 2")
- Press 'Cut' ~ Now your image will be drawn onto your cardstock
- Once completed, unload paper and swap cartridges to the Tags, Bags, Boxes and More
- Load the same sheet of paper just freshly drawn upon into your Cricut
- Switch out the marker for the blade assembly
- Choose your box of choice (I used the 'flrbox' for this project)
- Press the 'Fit to Page' button ON (make sure your Auto Fill button is OFF)
- Press 'Cut' ~ the Cricut will actually cut this image out at 8-3/4"
- Unload paper, remove cut image from mat, score & assemble your box... Presto ~ a completed box with customized images created with your Cricut!
Here are some other tips:
1) When assembling your box, you need to only glue the outside flaps into your box. There are only 2 per box for this particular image.
2) You do not necessarily need to adjust the pressure or speed on your Cricut machine when using markers - the general rule of thumb is the more pressure = thicker lines; higher speed = increased chance of drag marks with the markers across the page and in between the images. Play around with scrap paper first to see what you can achieve.
3) For faster assembly, choose one marker at a time per page when choosing the Auto Fill option. This can also work if you want different images onto the same piece of cardstock. Simply key in all the images you like in order of preference until the Cricut machine beeps letting you know that no more characters can fit.
4) If you want different colors of the same image, you cannot use the Auto Fill option but have to switch in and out your markers upon every completed drawing created = more time required.
5) You can only have 1 size per image or series of images using the Auto Fill option. If you like different sizes, you must wait until the Cricut has completed your current drawings = this will also require more time.
6) Use the Paper Saver option on both drawing and cutting to ensure you get as many images onto your cardstock as well the most images cut onto your box image.
7) If you have the 12x24 cutting mat, you can create 2 boxes at the same time along with tags from the spare part of the same cardstock (again ensure your Paper Saver option is on to maximize paper use)
8) As you can see from my example that I have chosen holes for my box to tie ribbon or in this case my tag through. You can choose the blackout feature if you do not want holes in any of the images in this cartridge set but you will need to score all the sides yourself before assembly.
To create the coordinating tag is quite simple...
- Using your Accent Essentials cartridge, choose the same shape you chose in creating your box making it larger but in proportion to the box itself (in this case I chose my image to be cut at 2-1/2")
- Using your Tags, Bags, Boxes and More cartridge chose the tag shape that best resembles your shape image from Accent Essentials (for me it was the circle tag) but as a shadow to the image above (for this project the circle tag was cut at 3")
Tip: Use your markers again to add emphasis to your images prior to cutting.
Well I hope that this project adds that special touch to your upcoming summer celebrations. It is quick and easy to do. Have fun and Until next week... Happy Crafting!


0 comments:
Post a Comment